
Whenever I work with printed fabric, I often wish that there was a way to visualize the pattern placement in the final garment before cutting into my precious fabric. Turns out, there is! If you have Photoshop and a good picture of your fabric, you can use Photoshop to experiment with the pattern placement in your garment. Basically, you fill in the line drawing for your garment with the pattern from your fabric, then move it around to figure out the best print placement for your project. Learn how in this video tutorial.
Instructions
Take photo of your printed fabric. Open the photo in Photoshop and mark the repeating motif. Do this by enabling the rulers in Photoshop (you can do this by going to View / Rulers). Drag the rulers across to define the vertical and horizontal edges of the repeating part of the pattern. Use the Rectangular Marquee tool to select the area within the ruler guidelines that you just defined. Go to Edit / Define Pattern From Selection, then give your pattern a name.
Open image of the line drawing of your pattern. Define the parts of the garment where you want to experiment with the print. Do this by creating a new layer, then use the paintbrush tool to paint inside the area where you want to experiment with the print (e.g., the front bodice area). Repeat this process with any other parts of the garment where you want to experiment with print, creating a new layer for each part of the garment.
Fill the line drawing with your print. Select the layer with the part of the garment that you want to fill with the print. Use the Rectangular Marquee tool and select an area that is much bigger than the part of the garment that you want to fill. In the toolbar on the right-hand side, select Create new fill or adjustment layer (it looks like a black and white cookie) / Pattern, then make sure the pattern you defined in the first step is selected (if not, you can click on the arrow to the right of the box and select your pattern). Reduce the scale to 25% to start with — you may need to adjust later on to make the print fill reflect the true scale of your printed fabric.
In the tool on the right-hand side, hover over the layer you just filled with the pattern, then right click and select Create Clipping Mask. That will eliminate all of the extraneous pattern fill in your image, so the pattern should now only fill the part of the garment where you wanted it to show. Repeat this fill process with all other parts of the garment that you want to fill with the print.
Experiment with the print placement by using the Move tool to move the pattern fill around in the garment.
A few additional notes
Make sure you have a good photo of your fabric that is taken directly overhead with good lighting and no distortions in the fabric. If it’s warped or isn’t laying flat, your pattern repeat won’t look very good when you insert it into your line drawing.
You don’t need to have the expensive professional version of Photoshop to do this. I have Photoshop Elements, which is the basic, cheaper version of Photoshop, and that is what I used in the tutorial above. I recommend getting Photoshop if you think you’re going to get into fashion design — it’s not just useful for photographers; it’s also really useful for visual creators of all types.
If you really want to make your rendering look as realistic as possible, you can warp and transform the pattern to fit along the curves of your garment. I don’t bother because my goal is just to get a rough approximation of what the final garment will look like, so I can decide how to cut out my pattern pieces. I’m not trying to create a professional rendering to sell the garment online, for example.
I tried to figure out a way to do this using free software like Microsoft Paint, but I couldn’t figure it out. I know there is free software like LightBox that is similar to Photoshop. It’s very possible that you could achieve the same results in LightBox (if someone knows how, please let me know in the comments!).
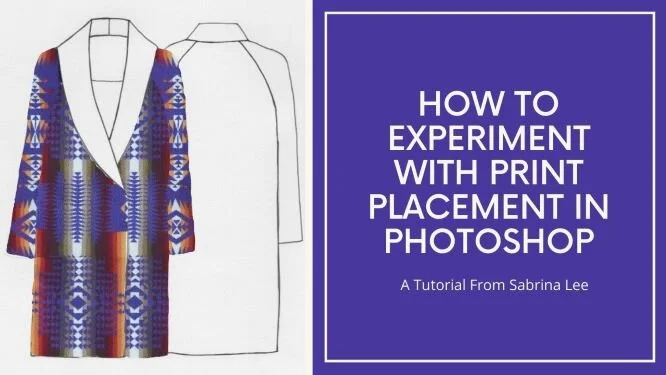
Hope this is helpful! As an aside, in the tutorial, I play with print placement for a cocoon coat that I made with a glorious Pendleton wool blanket I picked up from a thrift store for $10. Check out my post on the finished coat here!


