
Over the past decade, I’ve admired the sleek design and impeccable craftsmanship of Celine bags, but I’ve never been able to stomach the high cost of actually purchasing one. So when Vogue released Vogue 9074, a sewing pattern for a bag that looked nearly identical to the Celine Luggage Tote (a.k.a. the smiley face bag), I quickly snatched it up. And then…it sat in my stash for about 7 years. I’m not 100% sure why I put it off for so long, but it was probably because I was too intimidated to try making a bag out of leather.


Since then, I’ve spent a lot of time learning leatherworking techniques and making leather bags, to the point where I finally felt capable of tackling this project. The final piece of the puzzle fell into place when I came across this gorgeous pebbled taupe leather hide from Leather Treasure Shop.
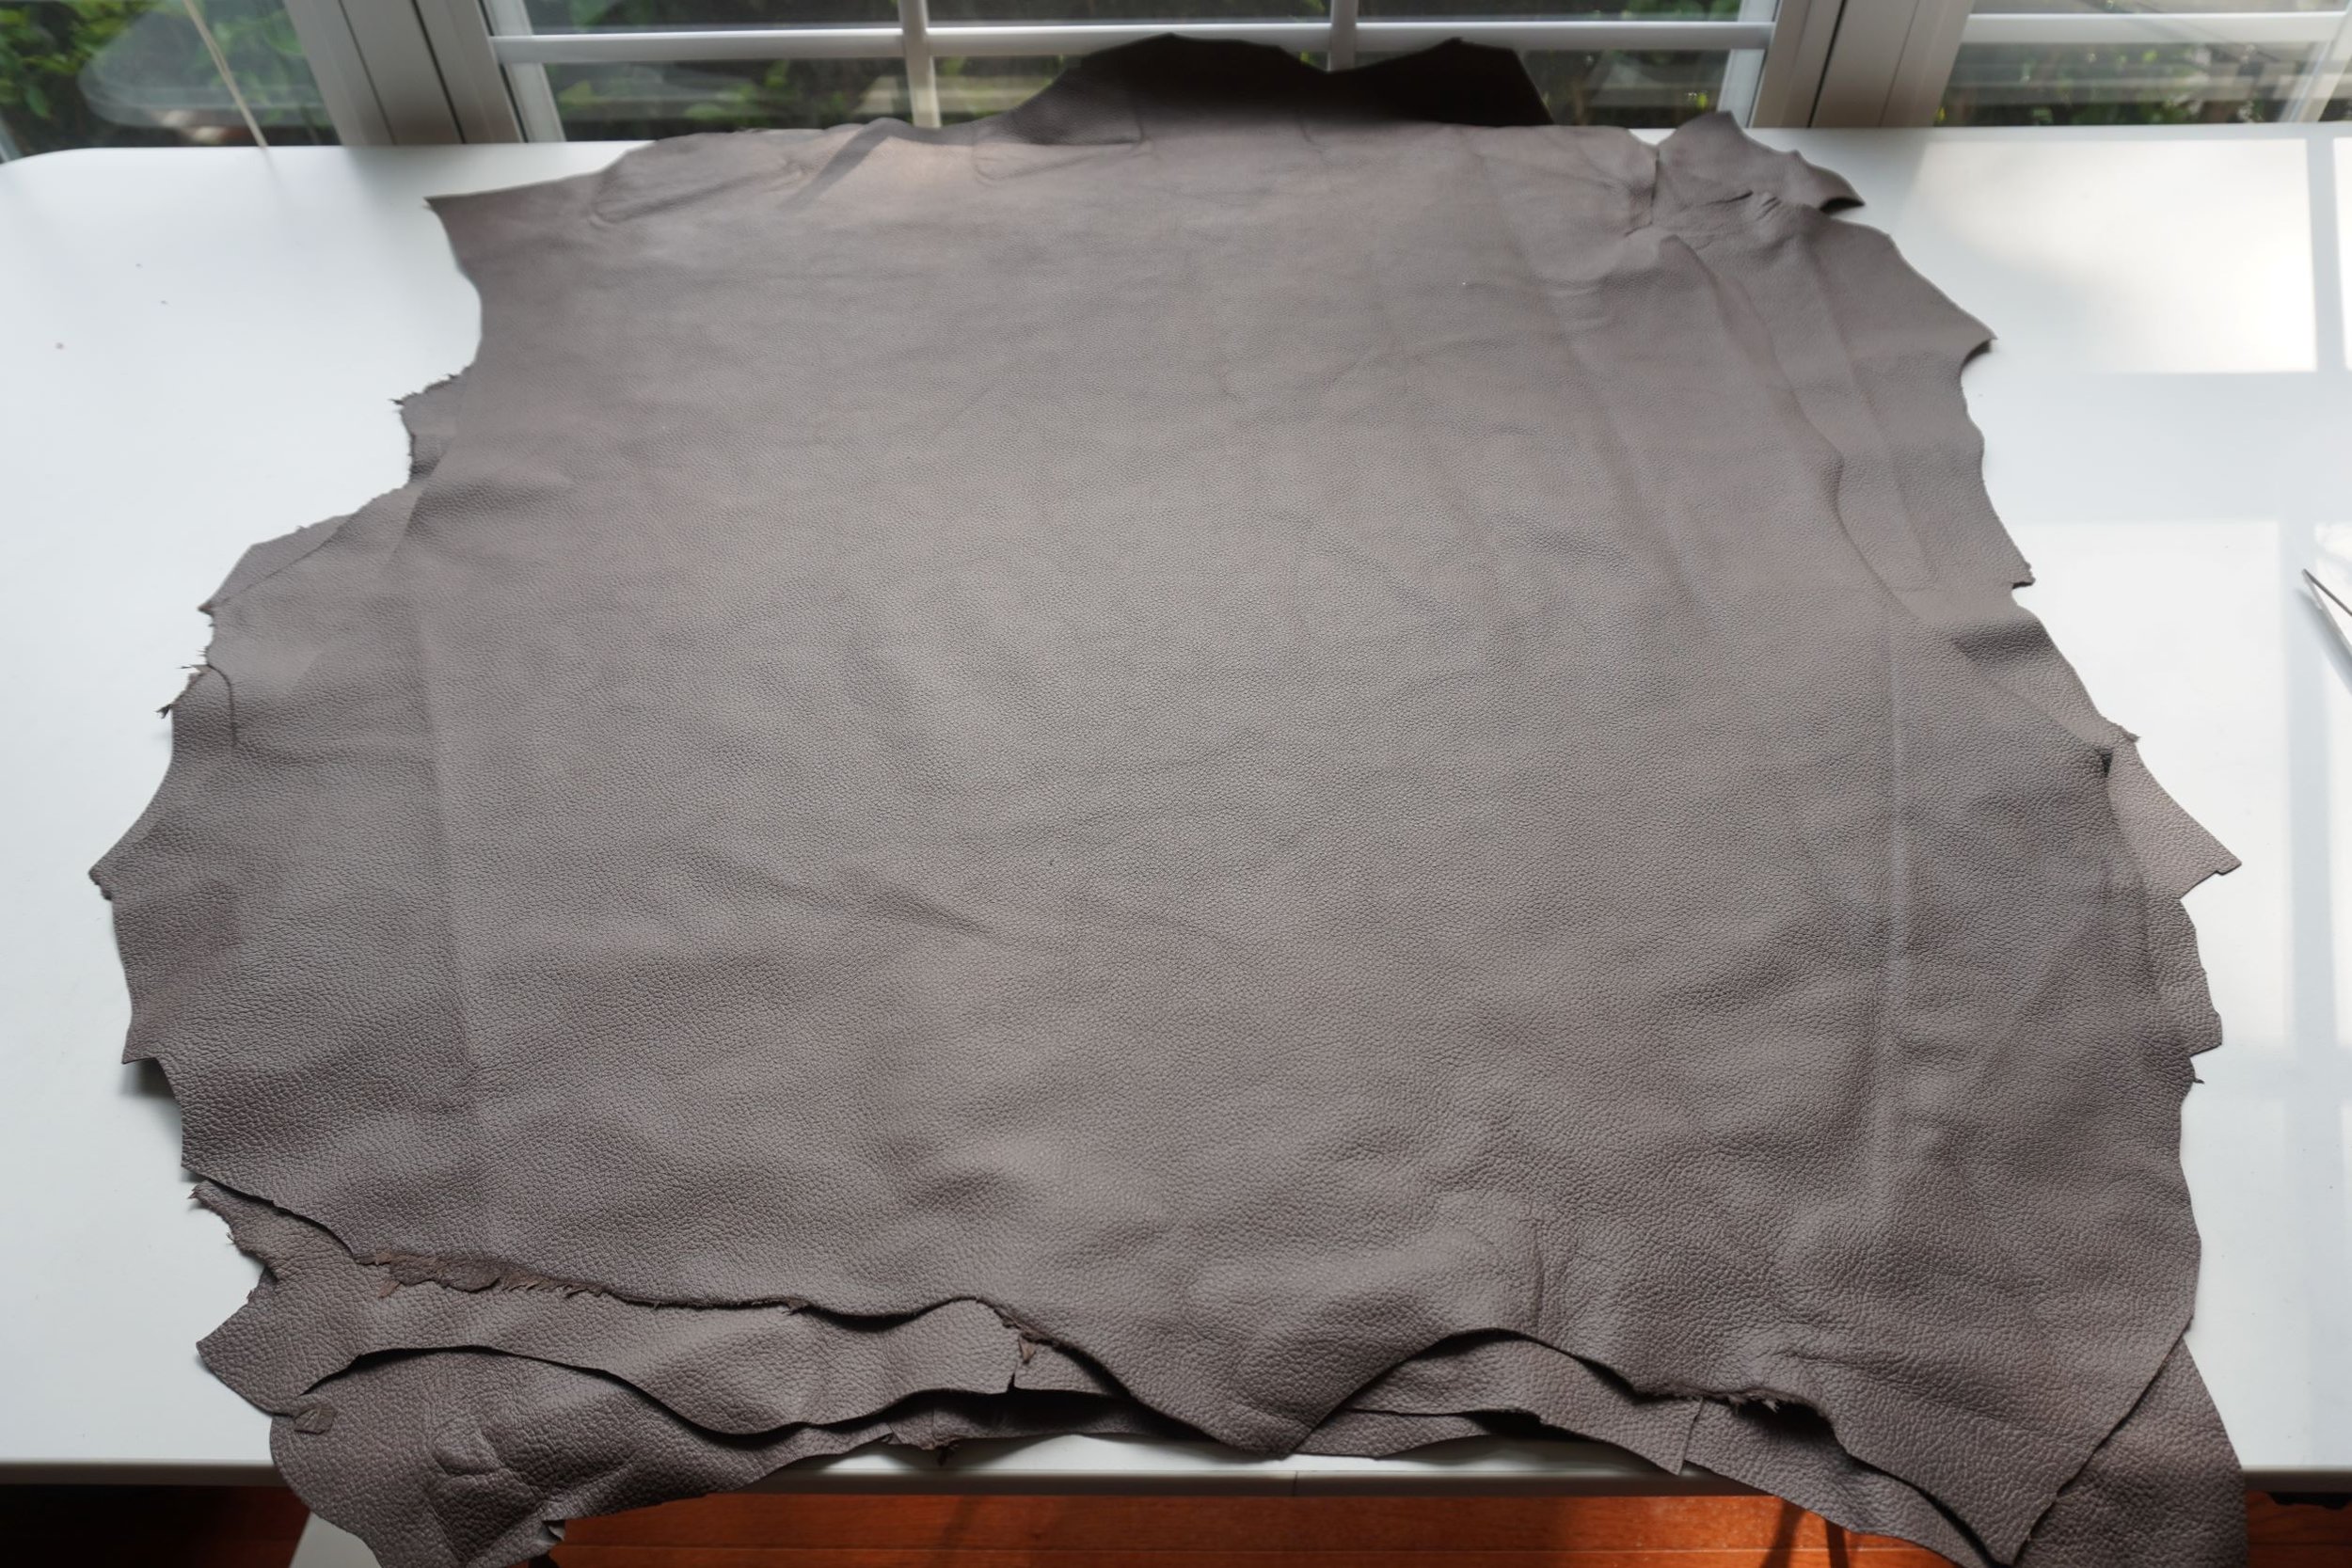
The texture and color of the leather looked like a very close match for the grey version of the Luggage Tote that I had been eyeing on the Celine website.

For reference, I got three full hides of leather (at about 6 sq. ft. each), although as it turns out I only needed two. The leather was about 1 mm (3 oz.) thick.
Although Vogue 9074 is drafted with a dropped-in fabric lining in mind, I decided to change this to a pigskin suede lining that is glued to the exterior leather, because I think that looks much more luxurious. Luckily, I had a piece of beige pigskin suede leftover from previous projects that paired well with the taupe leather. If you decide to go with a glued-in leather lining, you’ll need about 11 sq. ft. of lining leather.
In addition to the leather, I also needed some hardware and other supplies to make the bag. Some of these are listed on the pattern envelope, but I added a few others because I needed them to make the bag using leatherworking techniques, rather than the sewing techniques that are described in the pattern instructions (more on that below). The full list of supplies is below, with the additional items that I added in bold:
One or two 6” zippers, depending on the number of pockets you want in your bag (I only used one)
One ¾” magnetic snap
Four bag feet
Eight ¼” to 5/16” rivets (Note: the sizing refers to the length of the post, not the size of the cap)
1 5/8 yards of ½” upholstery cord
15” x 11” of plastic canvas
5 feet of 5/16” x 3/16” plastic tubing (Note: the sizing refers to the interior and exterior diameters of the tubing)
Double sided tape and/or rubber cement
I also used a range of leatherworking tools to cut, sew and finish the leather. You can find a detailed description of those tools in my post here.
Pattern Alterations
The Celine Luggage Tote comes in several different sizes, and I wanted to model mine on the dimensions of the Mini, which despite its name is actually a roomy, mid-sized tote measuring 12” x 12” x 7”. Fortunately, View B of the pattern already has the right width and height – all I needed to do was expand the sides of the bag by two inches (from 5” to 7”). To be specific, I increased the width of the bag side piece (piece no. 26), as well as the width of the bag bottom piece (piece no. 28) and facing (piece no. 30) to accommodate the wider side.
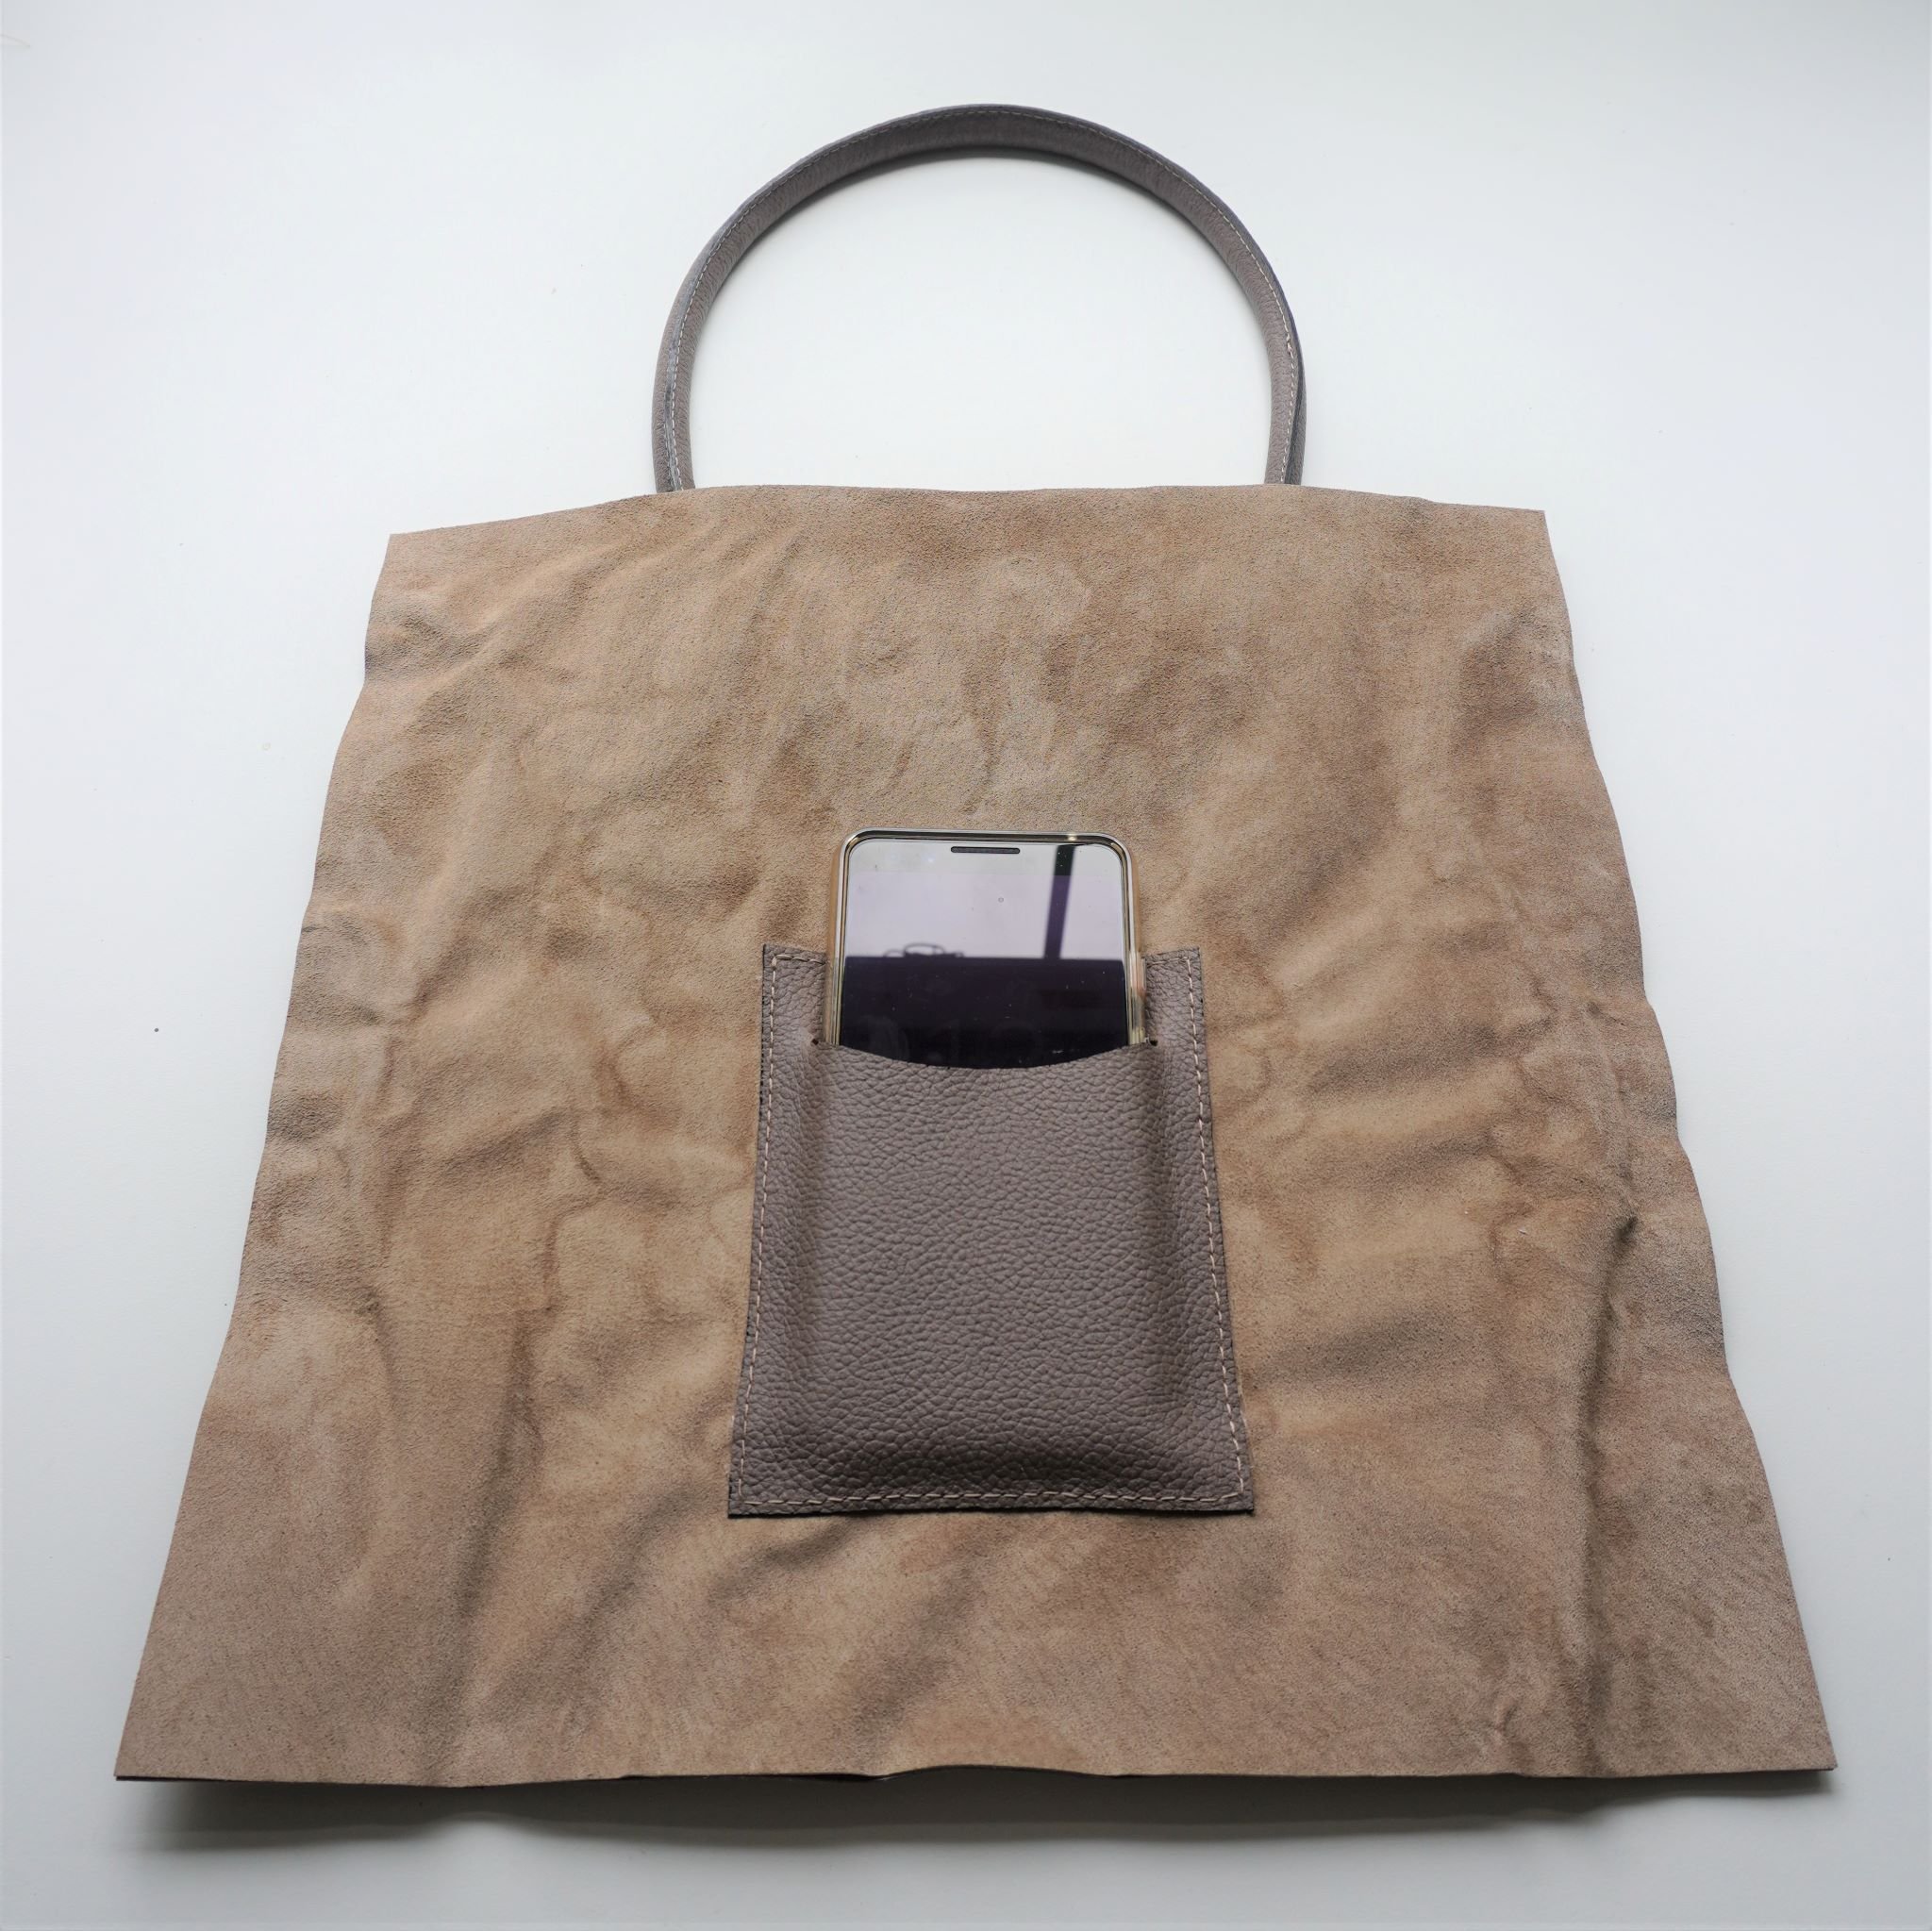
I also altered the size of the interior phone pocket. When this pattern was released back in the mid-2010s, phones were evidently much narrower, because I couldn’t get mine to fit into the slot. So I widened the phone pocket piece (piece no. 12) by ½ inch. I also increased the width of the curved ‘slash’ for the phone by about ¼ inch on either end, and I added an additional small hole on each end, to make it easier for the slash to open.
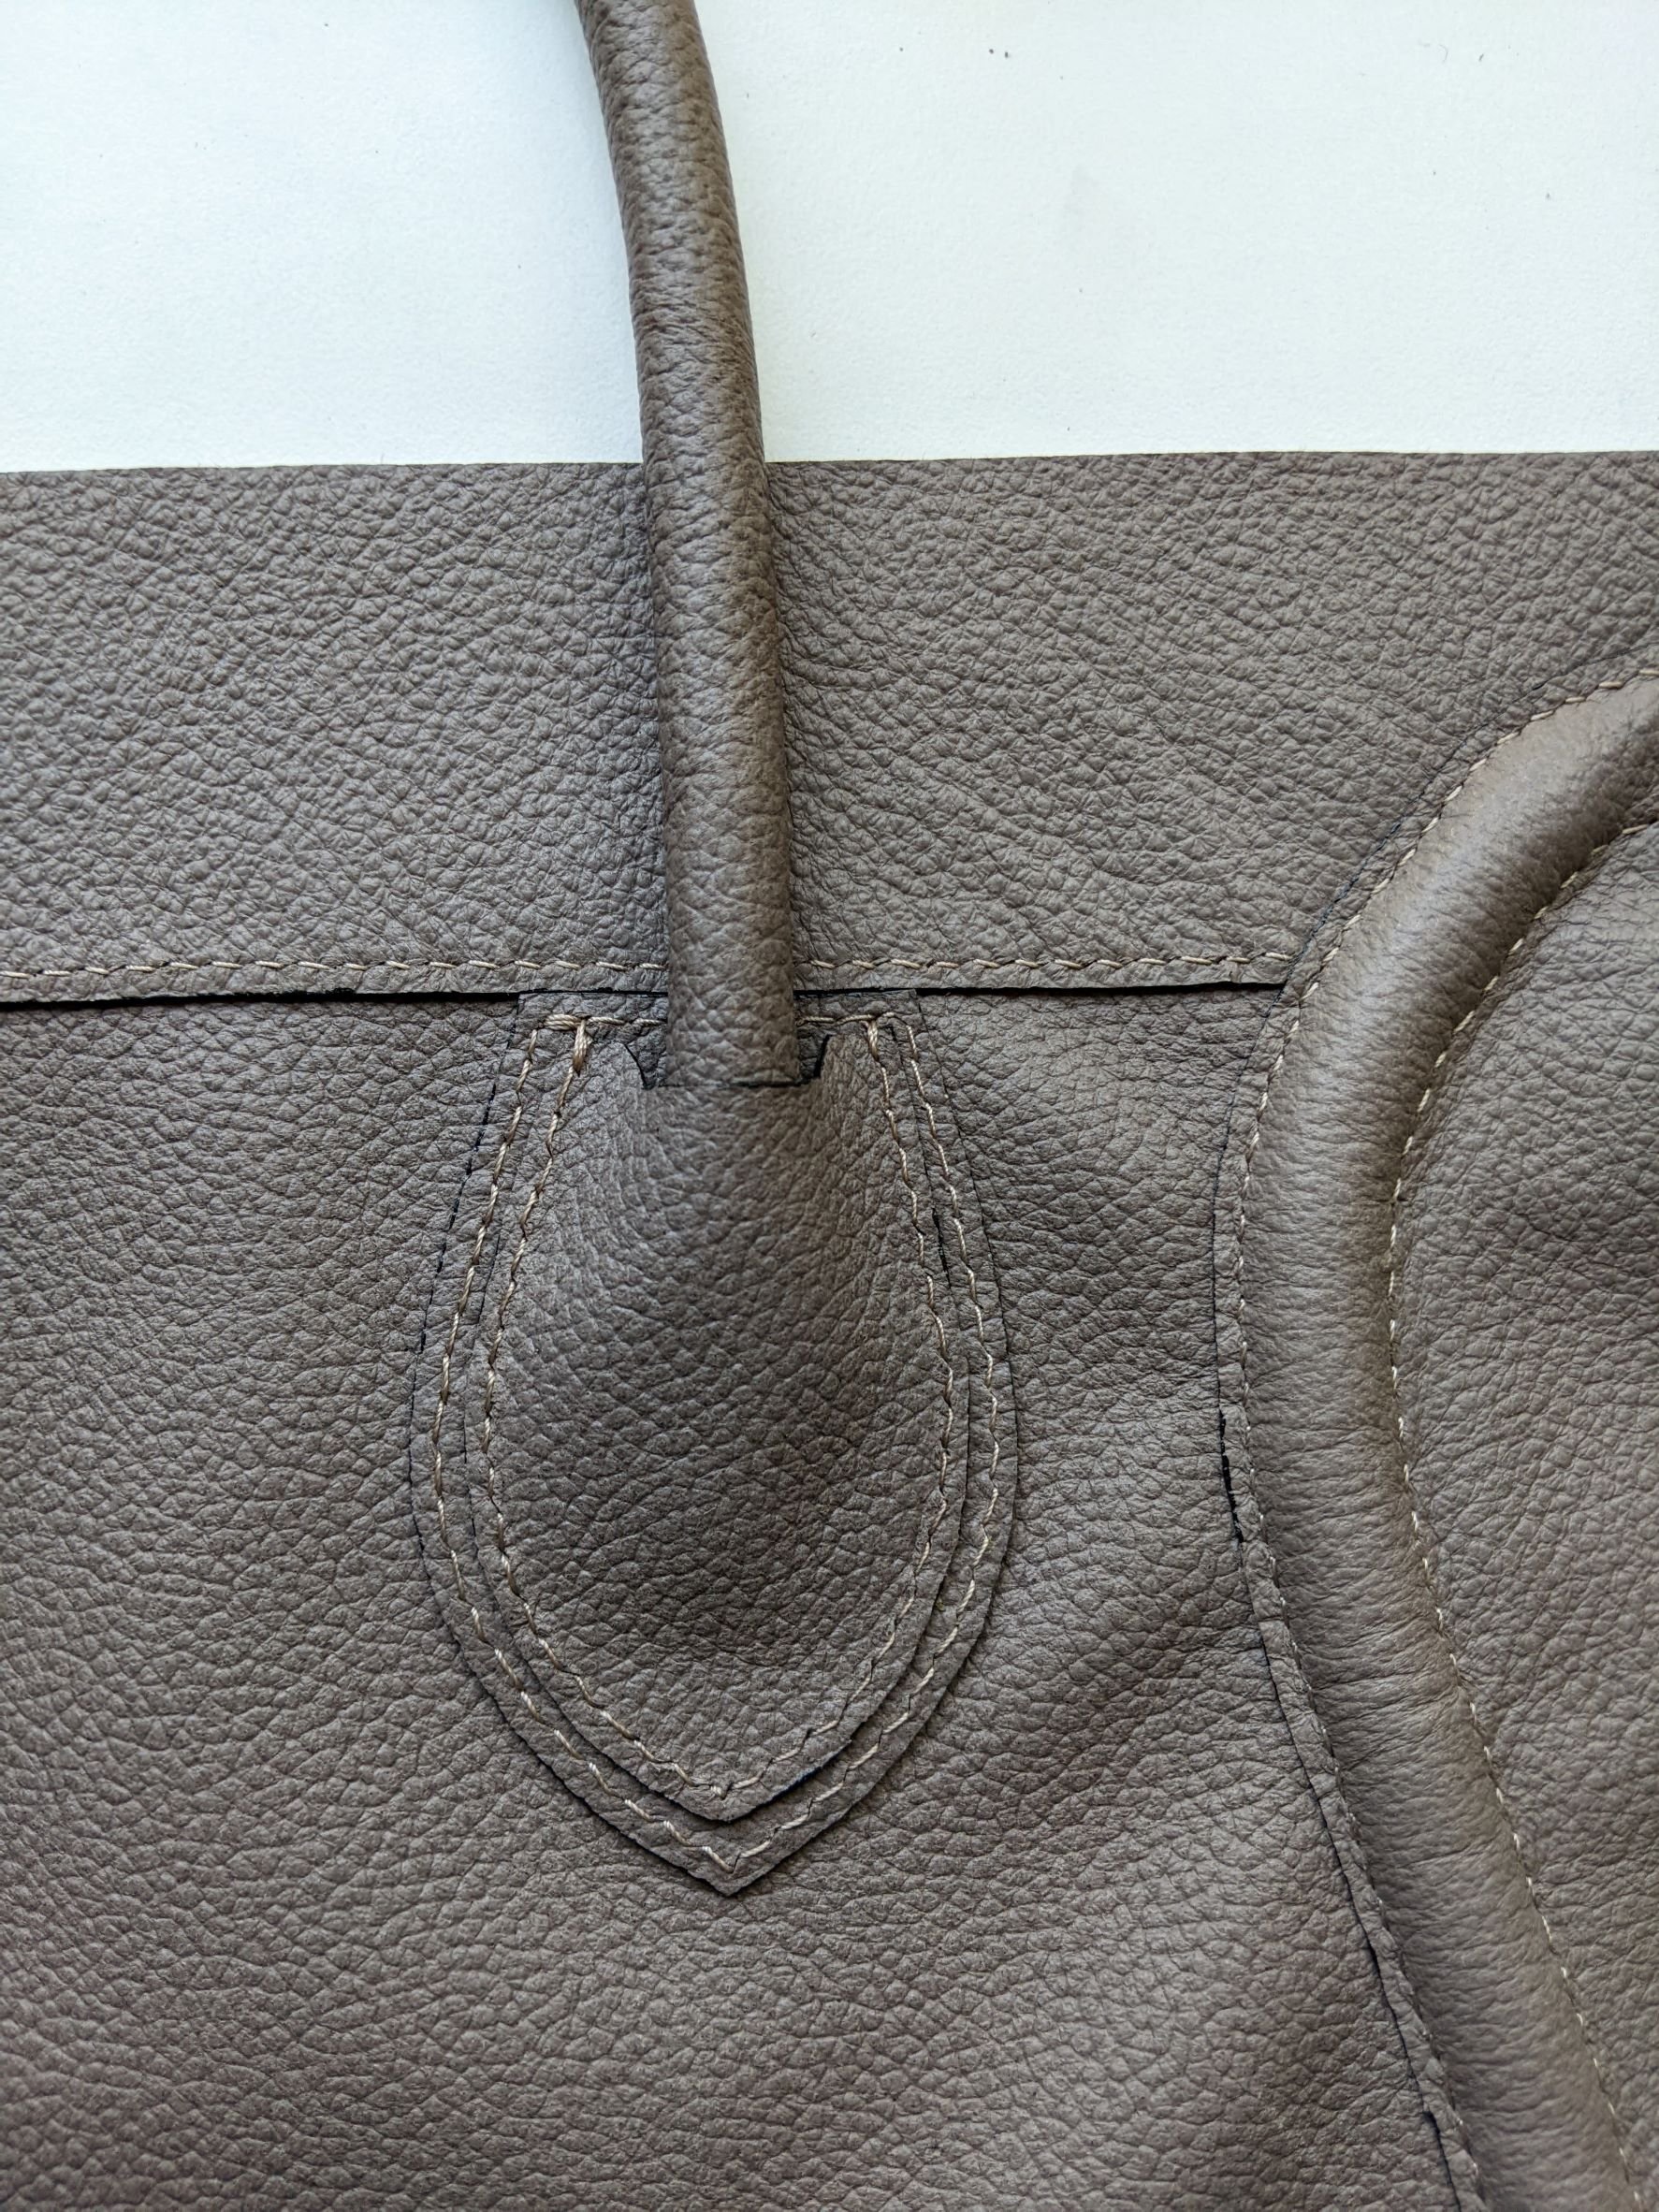
I also changed the design of the handle slightly. As drafted, the pattern called for one teardrop-shaped overlay piece to be stitched on the wrong side of the leather, as a reinforcement for the handle. Then, a slightly smaller teardrop shape was stitched on the right side of the leather, covering up the area where the handle is attached to the bag. I tried making a sample of this method using some faux leather I had in my stash, and I didn’t love the way it looked – the teardrop looked far too big, and I didn’t see the point of sewing the reinforcement on the wrong side of the bag. (Plus, I messed up the placement of the reinforcement, so you can see that the stitching lines of the reinforcement don’t match up exactly with the stitching lines on the teardrop on the right side of the bag. But that’s totally my fault, not the fault of the pattern.)

That led me to hunt online for close-up pictures of the handle of the real Celine bag. Those pictures showed that the Celine bag had two layered teardrops on the outside, with a little ‘notch’ cut out of the top of the smaller teardrop which is designed to hold the handle in place. It was easy enough to alter the pattern to make it look like the Celine bag – I simply reduced the size of the teardrops and cut out a notch in the smaller teardrop (see picture below). You can download the PDF pattern for my altered teardrop overlay pieces here, if you’re interested. Make sure you select “Actual Size” when printing the pattern out.

The only other thing I changed was to use the pattern pieces for the handle for View A, because I wanted to have a corded handle (i.e. round handle) instead of a flat handle (which is what View B contemplates). To do this, I not only had to use the handle and overlay pattern pieces for the View A handle, but I also needed to make sure that I used the handle placement markings on the front of the View A bag, rather than the handle placement markings on the front of the View B bag. (More on this below, when I describe the changes that I made to step 25.)
One last note: it is difficult, if not impossible, to transfer the markings for the placement of the cord, handles and pocket band from the pattern to the leather bag piece. Unlike in sewing, you can’t use tailor’s chalk and a tracing wheel, because chalk doesn’t transfer well to leather, plus you might end up with permanent markings or dents in the leather.
Instead, I made a placement guide from cardstock. In essence, I traced the front bag pattern piece onto cardstock, then cut out the curve where the cord is placed, plus where the teardrop for the handle goes and the cutout where the zipper goes. You only need to do this with one side of the pattern, because you can simply flip the pattern over to place the pieces on the other side of the bag. This card ‘guide’ made it much easier to place the various pieces in their proper place.

Constructing the Bag
With the pattern alterations complete, it was finally time to begin constructing the bag! For the most part, I followed the pattern instructions, but with a few key overall changes:
I changed the lining from a dropped-in lining to a glued lining.
I omitted the interior pocket, because it wasn’t possible to hide that pocket with a glued lining.
I finished the edge of the leather with edgepaint and Tokonole, rather than folding the edge over and stitching it down. I have a detailed post on how to finish leather edges with edgepaint here.
I hand-stitched the bag rather than sewing with my sewing machine. I decided to hand-stitch because that gave me more control, but it is definitely very time-consuming and it may not be the right choice for everyone. Note that with the thinner leather that I was working with (around 3 oz), I probably could have sewn it successfully using my sewing machine, but it won’t work with a thicker leather.
Those four key overall changes required several changes to the construction process described in the pattern. First of all, before even starting on the pattern instructions, I needed to cut out the lining using the pattern pieces for the exterior of the bag, rather than the lining pattern pieces. This is because the pattern was originally drafted for a dropped-in fabric lining, with a seam allowance on all sides, and I wanted to change this to a glued-in leather lining, which did not require the same seam allowance.
Once all the pieces were cut out, I needed to paint the edges of some of the pieces. Now some edges of the bag are painted only after they are sewn (e.g., the top and side edges), but other edges need to be edge painted before construction because it is difficult/impossible to cleanly edge paint them after they are sewn (e.g., the teardrops for the handles, the curved side panels). Below is a list of all of the pieces that I edgepainted before beginning bag construction. Note that for some pieces, you only need to finish some of the edges, because the other edges of the piece will be painted later on in the process:
I painted all edges of the handle teardrop overlay pieces (this is piece nos. 7 and 8 in the original pattern, or you can use the altered pattern pieces that I drafted)
I painted all outer edges of the pocket band, along with all inner edges of the hole for the zipper (piece no. 20).
I painted all edges of the phone pocket (piece no. 12), including the edges of the ‘slash’.
I painted the lower edge only of the upper band (piece no. 18). The other edges will be painted later on in the process.
I painted the lower edge only of the facing (piece no. 30). The other edges will be painted later on in the process.
I painted the curved edge only of the side panels (piece no. 22). The other edges will be painted later on in the process.
I painted the long edges of the bag bottom (piece no. 25). The shorter side edges will be painted later on in the process.
With the pieces cut out and prepped, I could finally start working on the steps described in the pattern instructions! As I said above, for the most part I followed the pattern instructions, but I did need to make changes to several of the steps in light of the overall changes that I described above:
I followed steps 1-6 in the Bag B instructions pretty much as described, with two exceptions. First, in steps 3 and 5, I used double-sided tape instead of pins & basting to secure the zipper and pocket band. Second, in step 5, I hand-stitched along the inner edges of the pocket band (i.e. along the sides of the hole for the zipper). I used a pair of wing dividers to mark the stitching line, then hand-punched the stitching holes and hand-stitched using a saddle stitch. I think this allowed for better control than using a sewing machine. I also hand-stitched along the lower outer edge only of the pocket. I did not stitch along the upper or side outer edges of the pocket band.
I then skipped steps 7-8, as those involved installing the front pocket, and I needed to do that after the lining was installed. Instead, I moved on to steps 8 and 9 to install the side panels and cord.
Next, I switched to the pattern instructions for Bag A and followed steps 16-30 to install the handles, with a few changes. These changes were:
In step 19, I hand-punched and hand-stitched the stitching close to the tubing. This allows you to get much, much closer to the tubing than doing this on the sewing machine with a roller foot or zipper foot, as the pattern instructions suggest.
After trimming off the excess leather in step 20, I painted the edge of the handle and buffed with Tokonole.
In step 22, I used my altered pattern pieces for the handle teardrop overlay.
In steps 23 and 24, instead of sewing the teardrop to the wrong side of the bag, I stitched the larger teardrop to the right side of the bag, using my card placement guide to place the teardrop in the right place. I used rubber cement to secure the teardrop, then I hand-punched and hand-stitching around the edge.
I followed step 25 pretty much exactly, but note that you must use the markings on the pattern piece for Bag A for proper placement of the handles and rivets. (I made the mistake of trying to use the placement line on the pattern for Bag B, and I wondered why the handle kept ending up in the wrong place! D’oh!)
In step 26, I used my altered pattern piece for the smaller teardrop overlay, and I didn’t turn over the upper edge.
In steps 27 and 28, I used rubber cement to glue the smaller overlay on top of the larger overlay and the handle, then I hand-punched and hand-stitched along the sides of the overlay, making sure to make one stitch over the top edge of the teardrop (this helps make the overlay more secure).
In step 29, I trimmed down the top of the plastic reinforcement, to fit my (now slightly smaller) teardrop overlays. I don’t remember exactly how much I took off, but I think it was between ¼ to ½ inch.
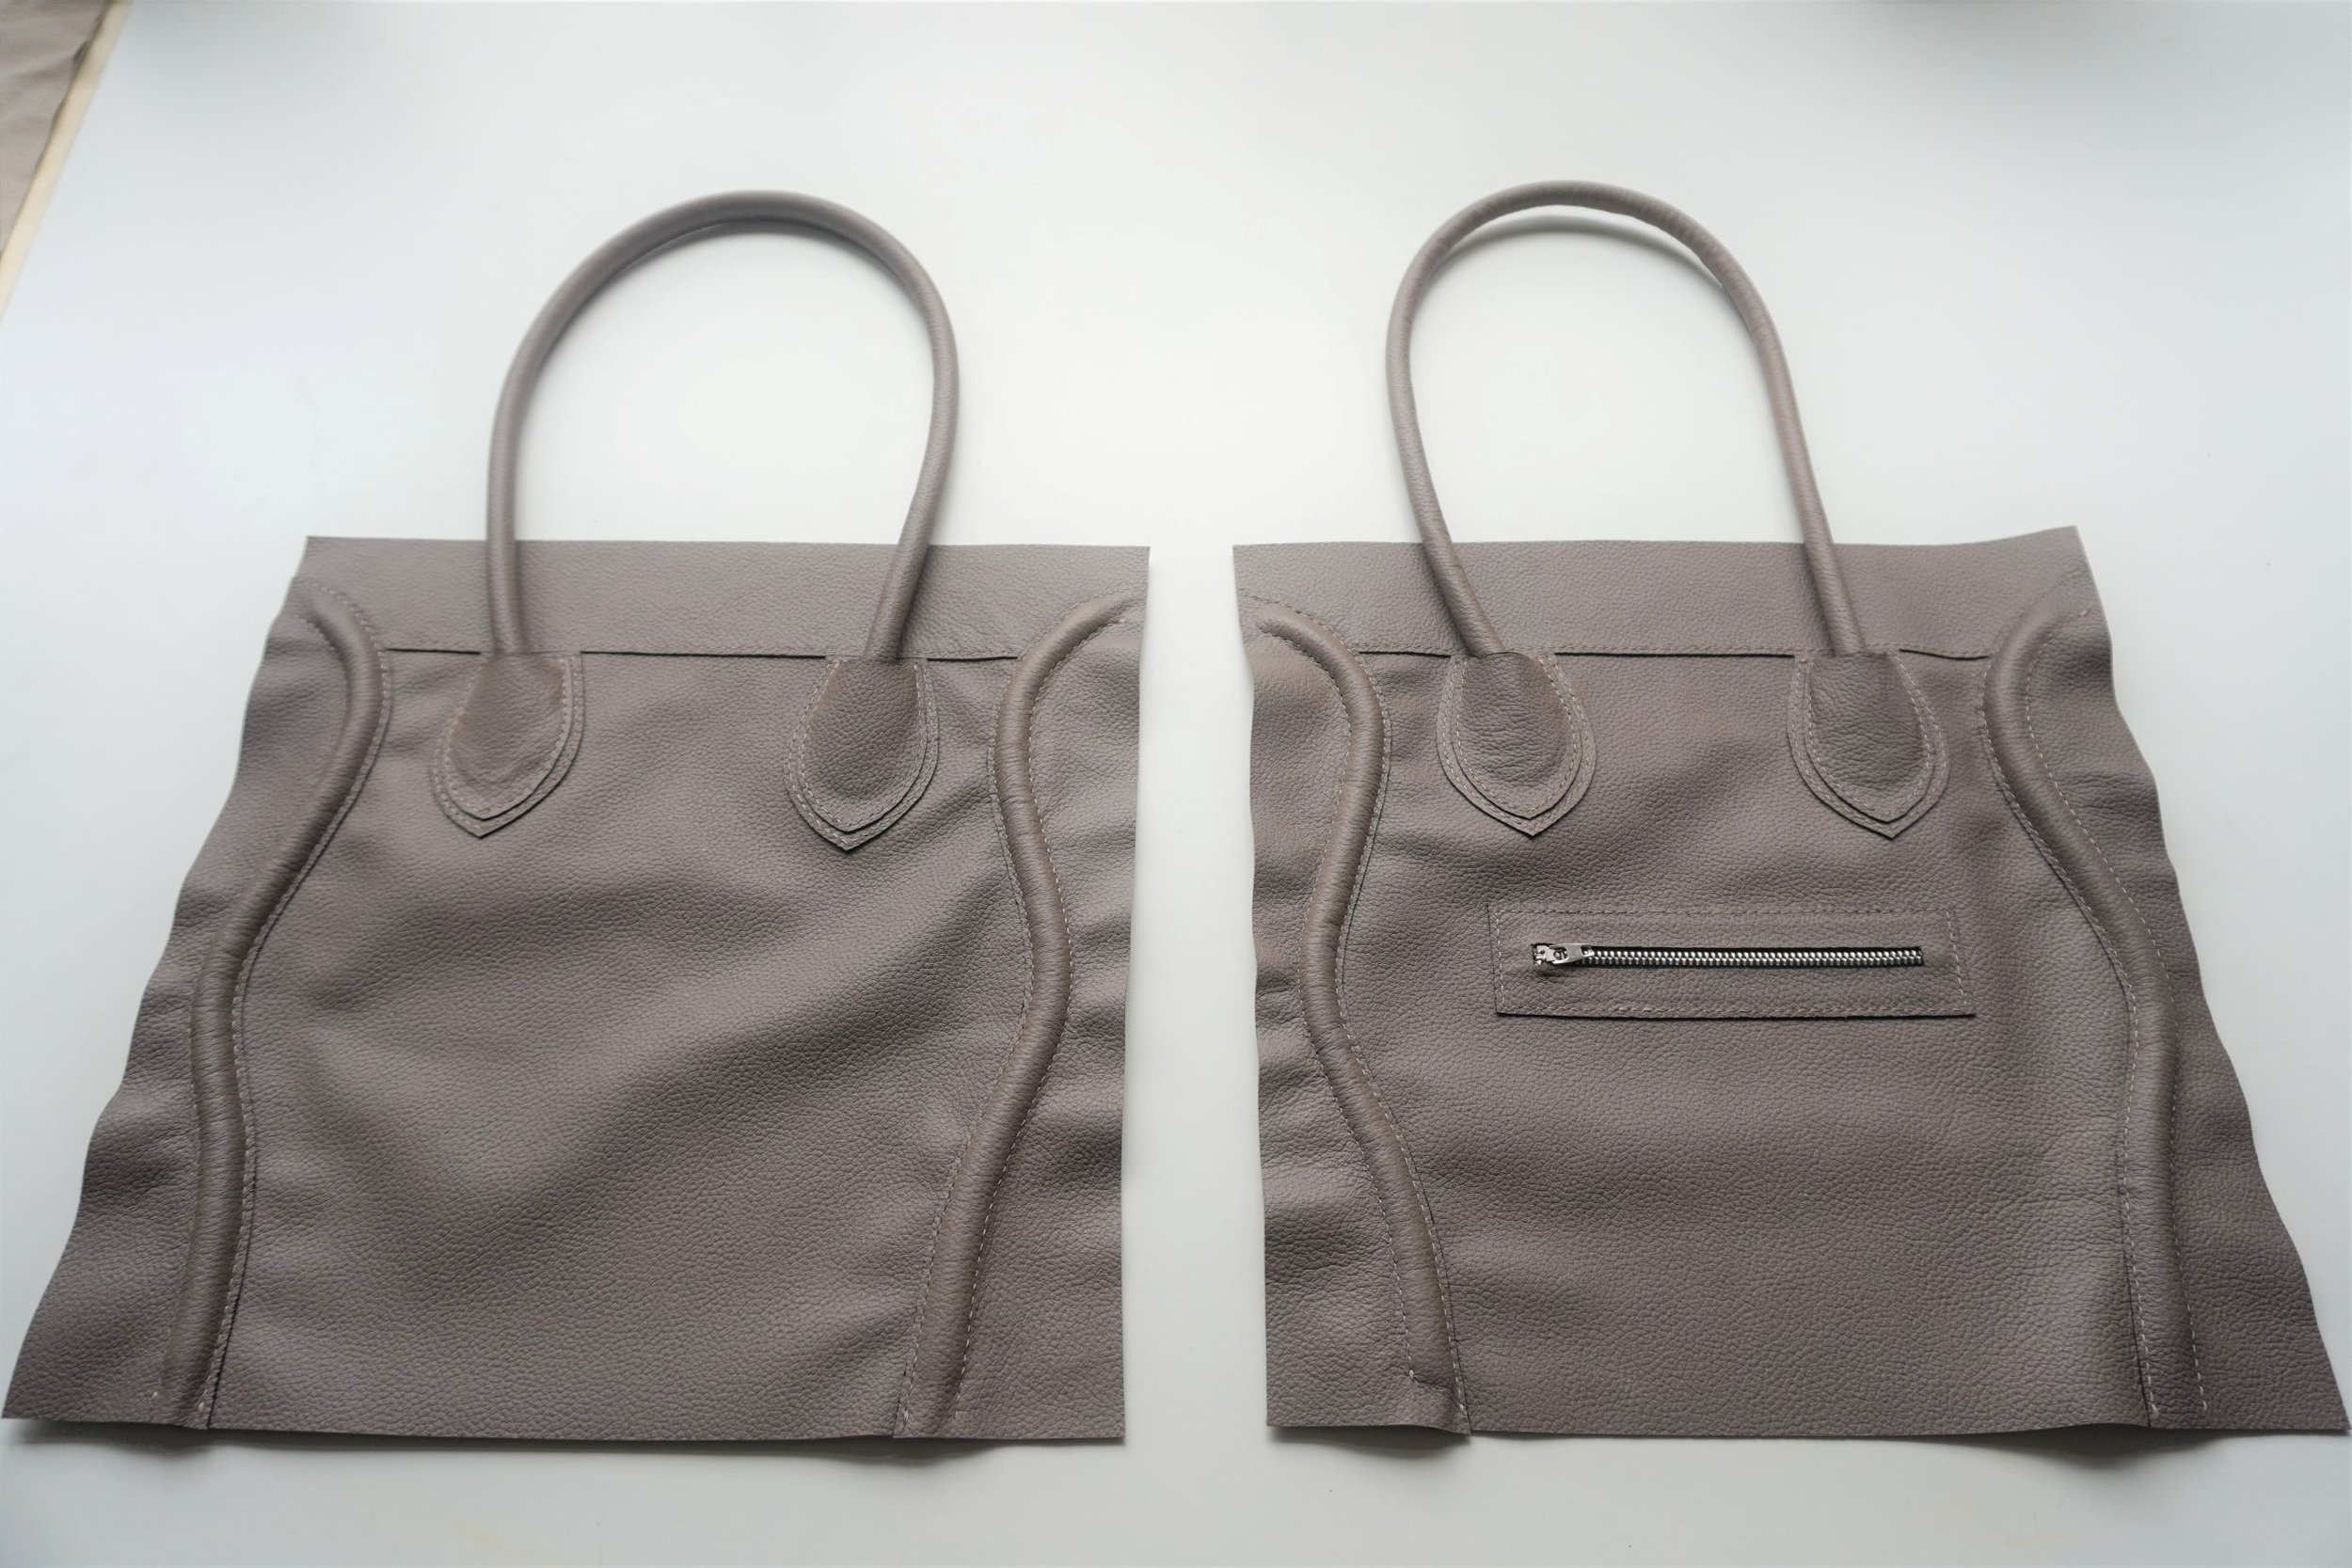
Finished front and back pieces
I then took a break from the pattern instructions to work on the lining pieces.
First, I installed the phone pocket on the lining for the back piece, following steps 38 and 39 of the Bag A instructions.
Next, I cut out the hole for the zipper on the lining for the front piece.
Then, I glued the lining of the front, back and side pieces to their respective exterior pieces. I decided to glue the lining in after installing the side panels and handles because the lining hides all of the stitching on the wrong side. This in my opinion gives a much neater finish in the interior of the bag.
Once the lining was glued, I went back to steps 7-8 of the Bag B instructions and installed the front pocket. I made a few changes here as well:
In step 7, I used double sided tape to stick the front pocket in place.
In step 8, I hand-stitched along the upper and side edges of the pocket band, along with the seamline for the front pocket. Again, I think doing this by hand allowed for much better control than using a sewing machine.
Next, I moved on to sewing the bag bottom to the front and back pieces. First, I switched to the Bag A instructions and followed steps 31-35 to install the plastic canvas which stiffens the bottom of the bag. I then followed step 36 to sew the bottom to the front and back pieces, using double sided tape to stick the pieces together before hand-stitching them in place.

Bag bottom + plastic canvas stiffener
Then, I switched back to the Bag B instructions and followed step 15 to sew the side pieces in place. I used double sided tape to secure the pieces before hand-stitching in place.
Next, I installed the facing, largely following steps 25-31 of the Bag B instructions. Of course, there were a few changes:
I skipped step 26, as there was no fabric lining to sew the facing to.
In steps 27 and 28, instead of using webbing, I glued some lining to the wrong side of my tab. This reinforced the tab but gave it a nicer finish than webbing (in my opinion). I also painted the edge of the tab before installing it to the facing.
Once the facing and magnetic snap were installed, I painted the top and side edges of the bag with black edge paint. I finished by buffing the edge with some Tokonole.
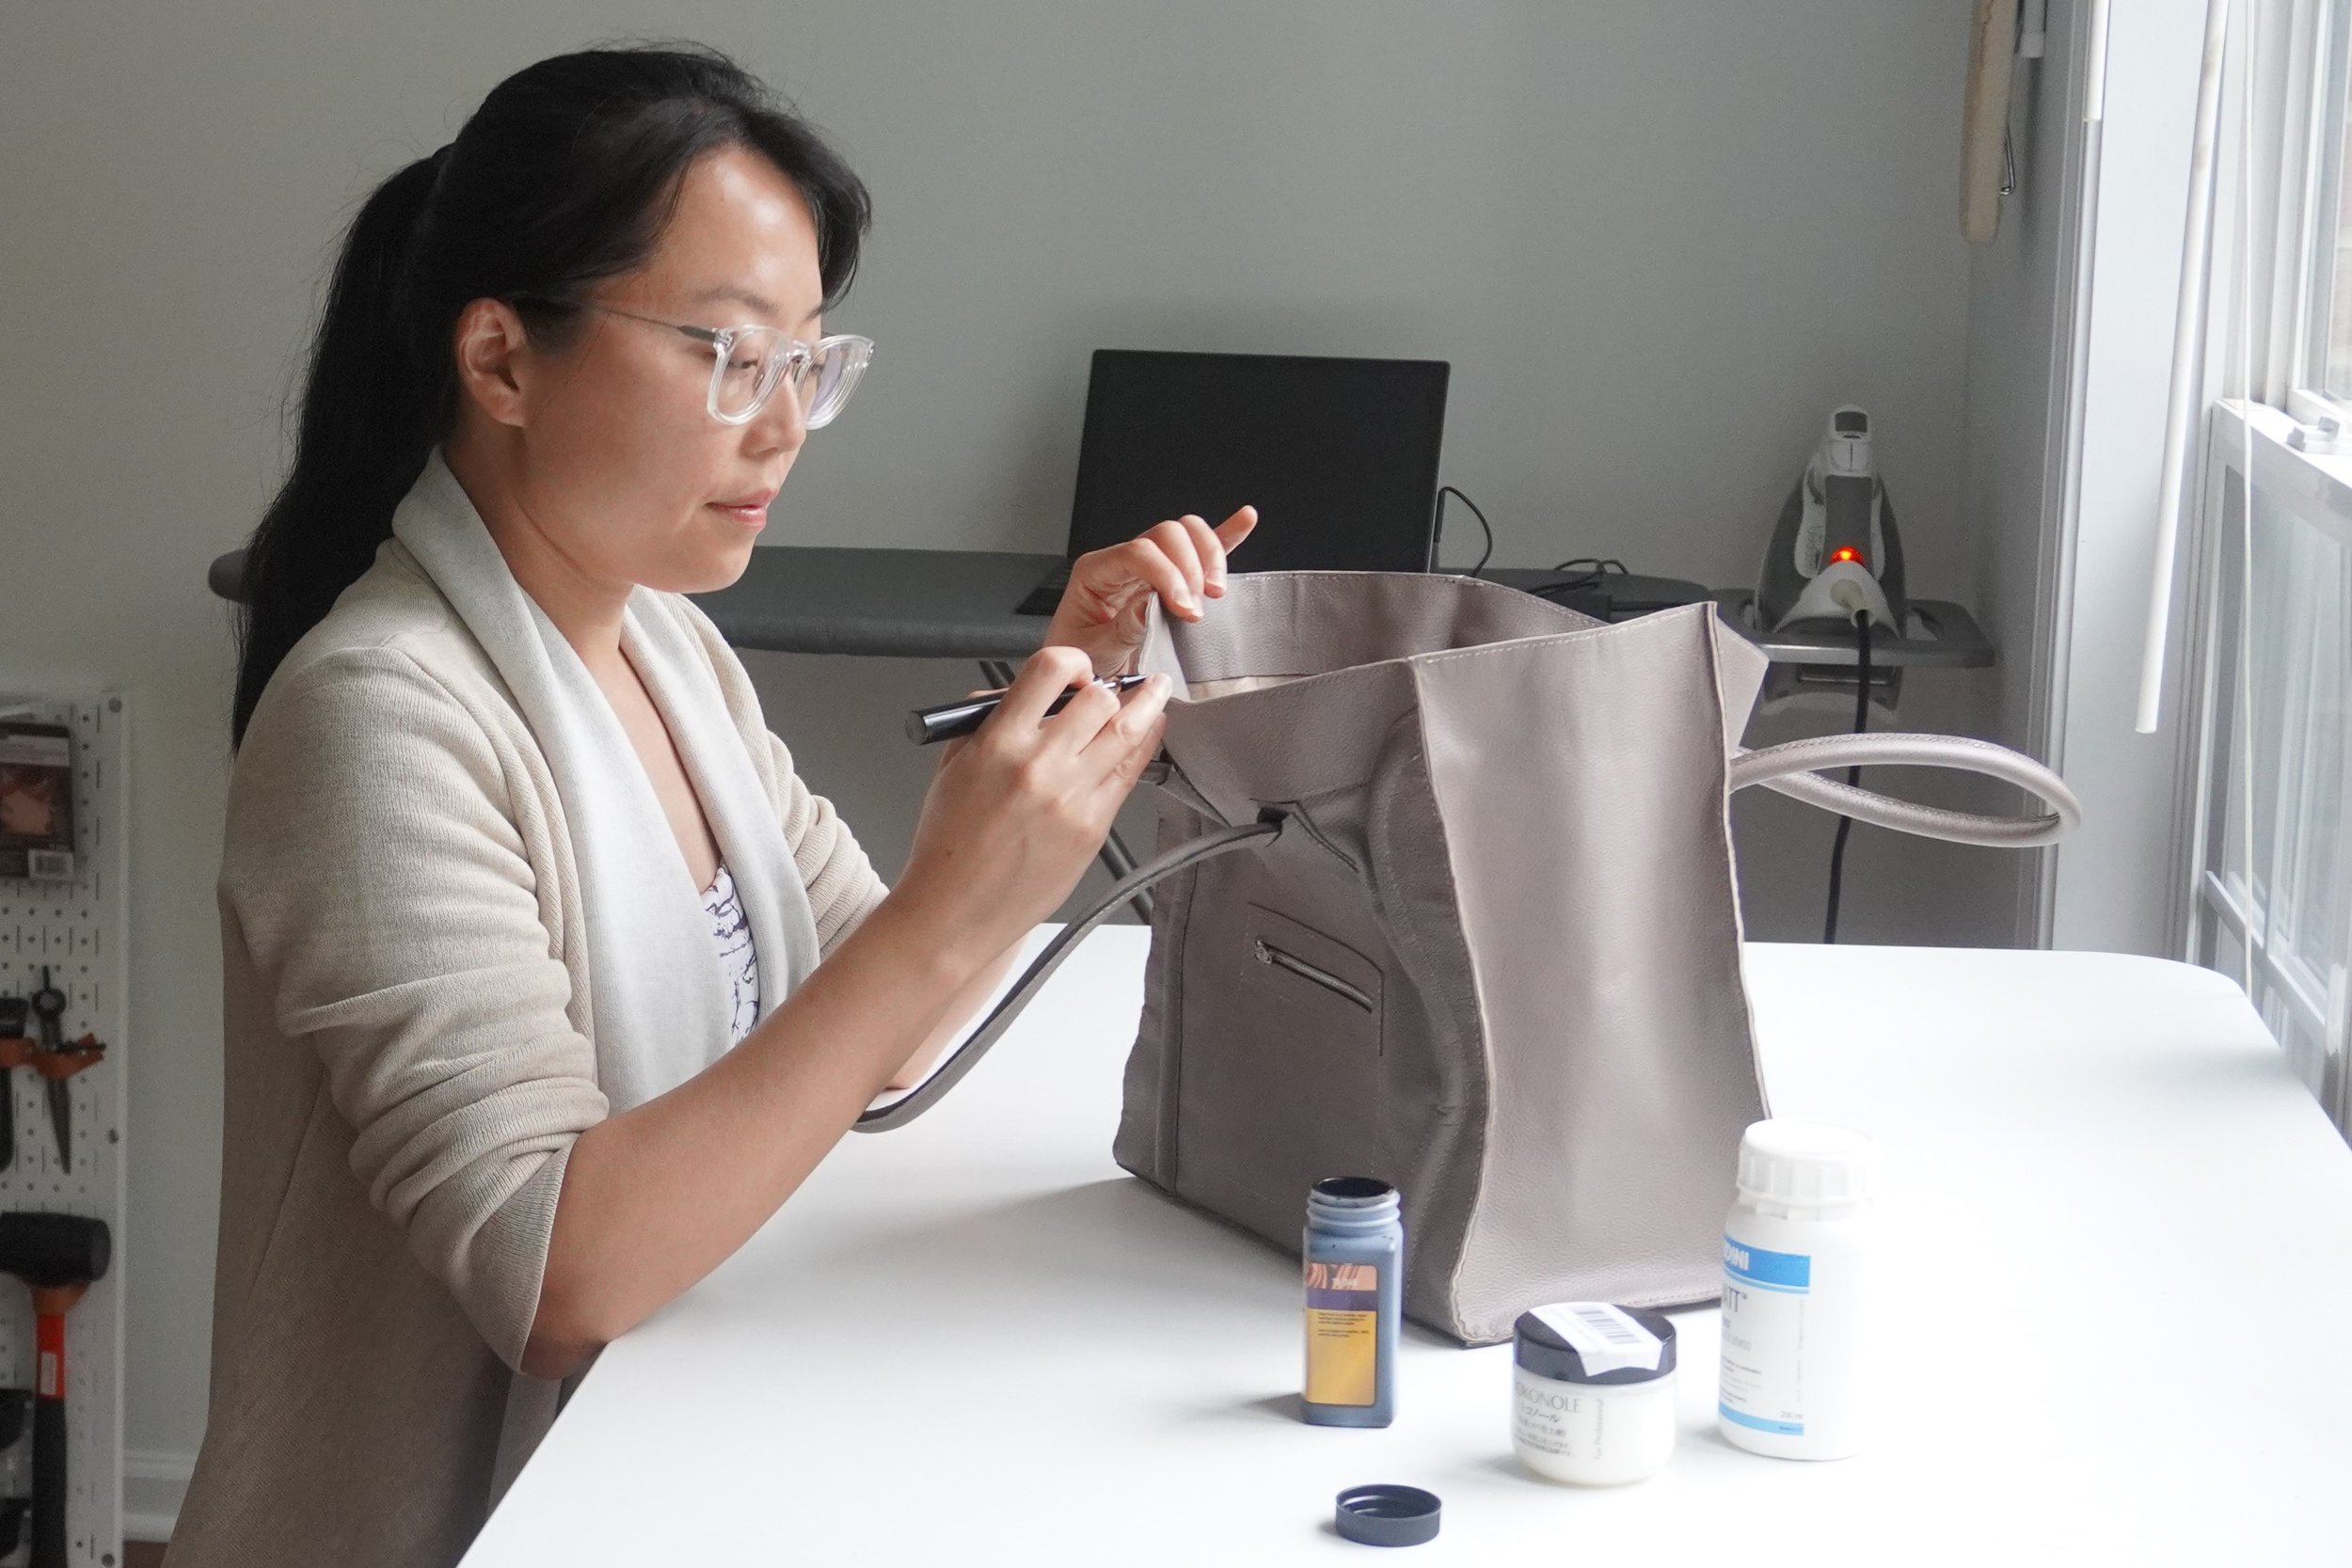
Painting the top and side edges with black edge paint
And that’s it! I know that all sounds quite complicated, but it’s actually really not that bad in reality (it just sounds more complicated than it really is when written out in full). If you’re more of a visual person, here’s a video showing the construction process of the bag. This won’t give you all the step-by-step detail that the above written description gives, but it will show you some visual glimpses of most of the steps:
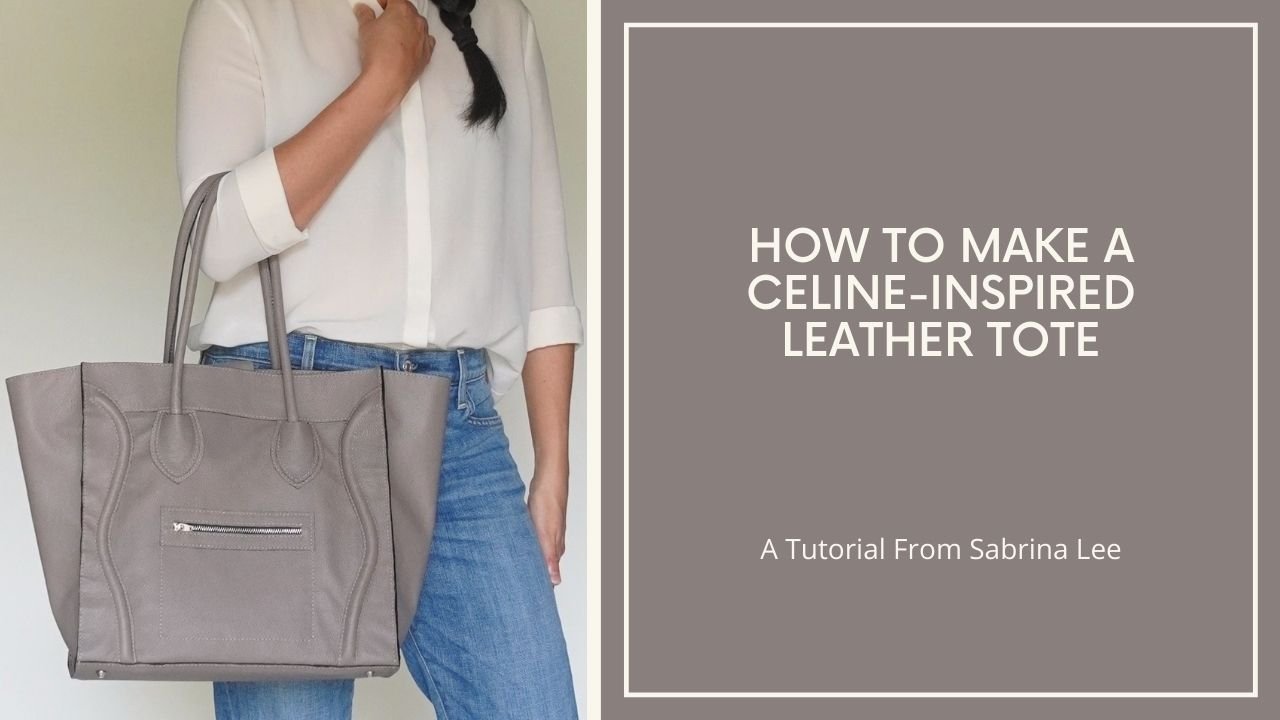
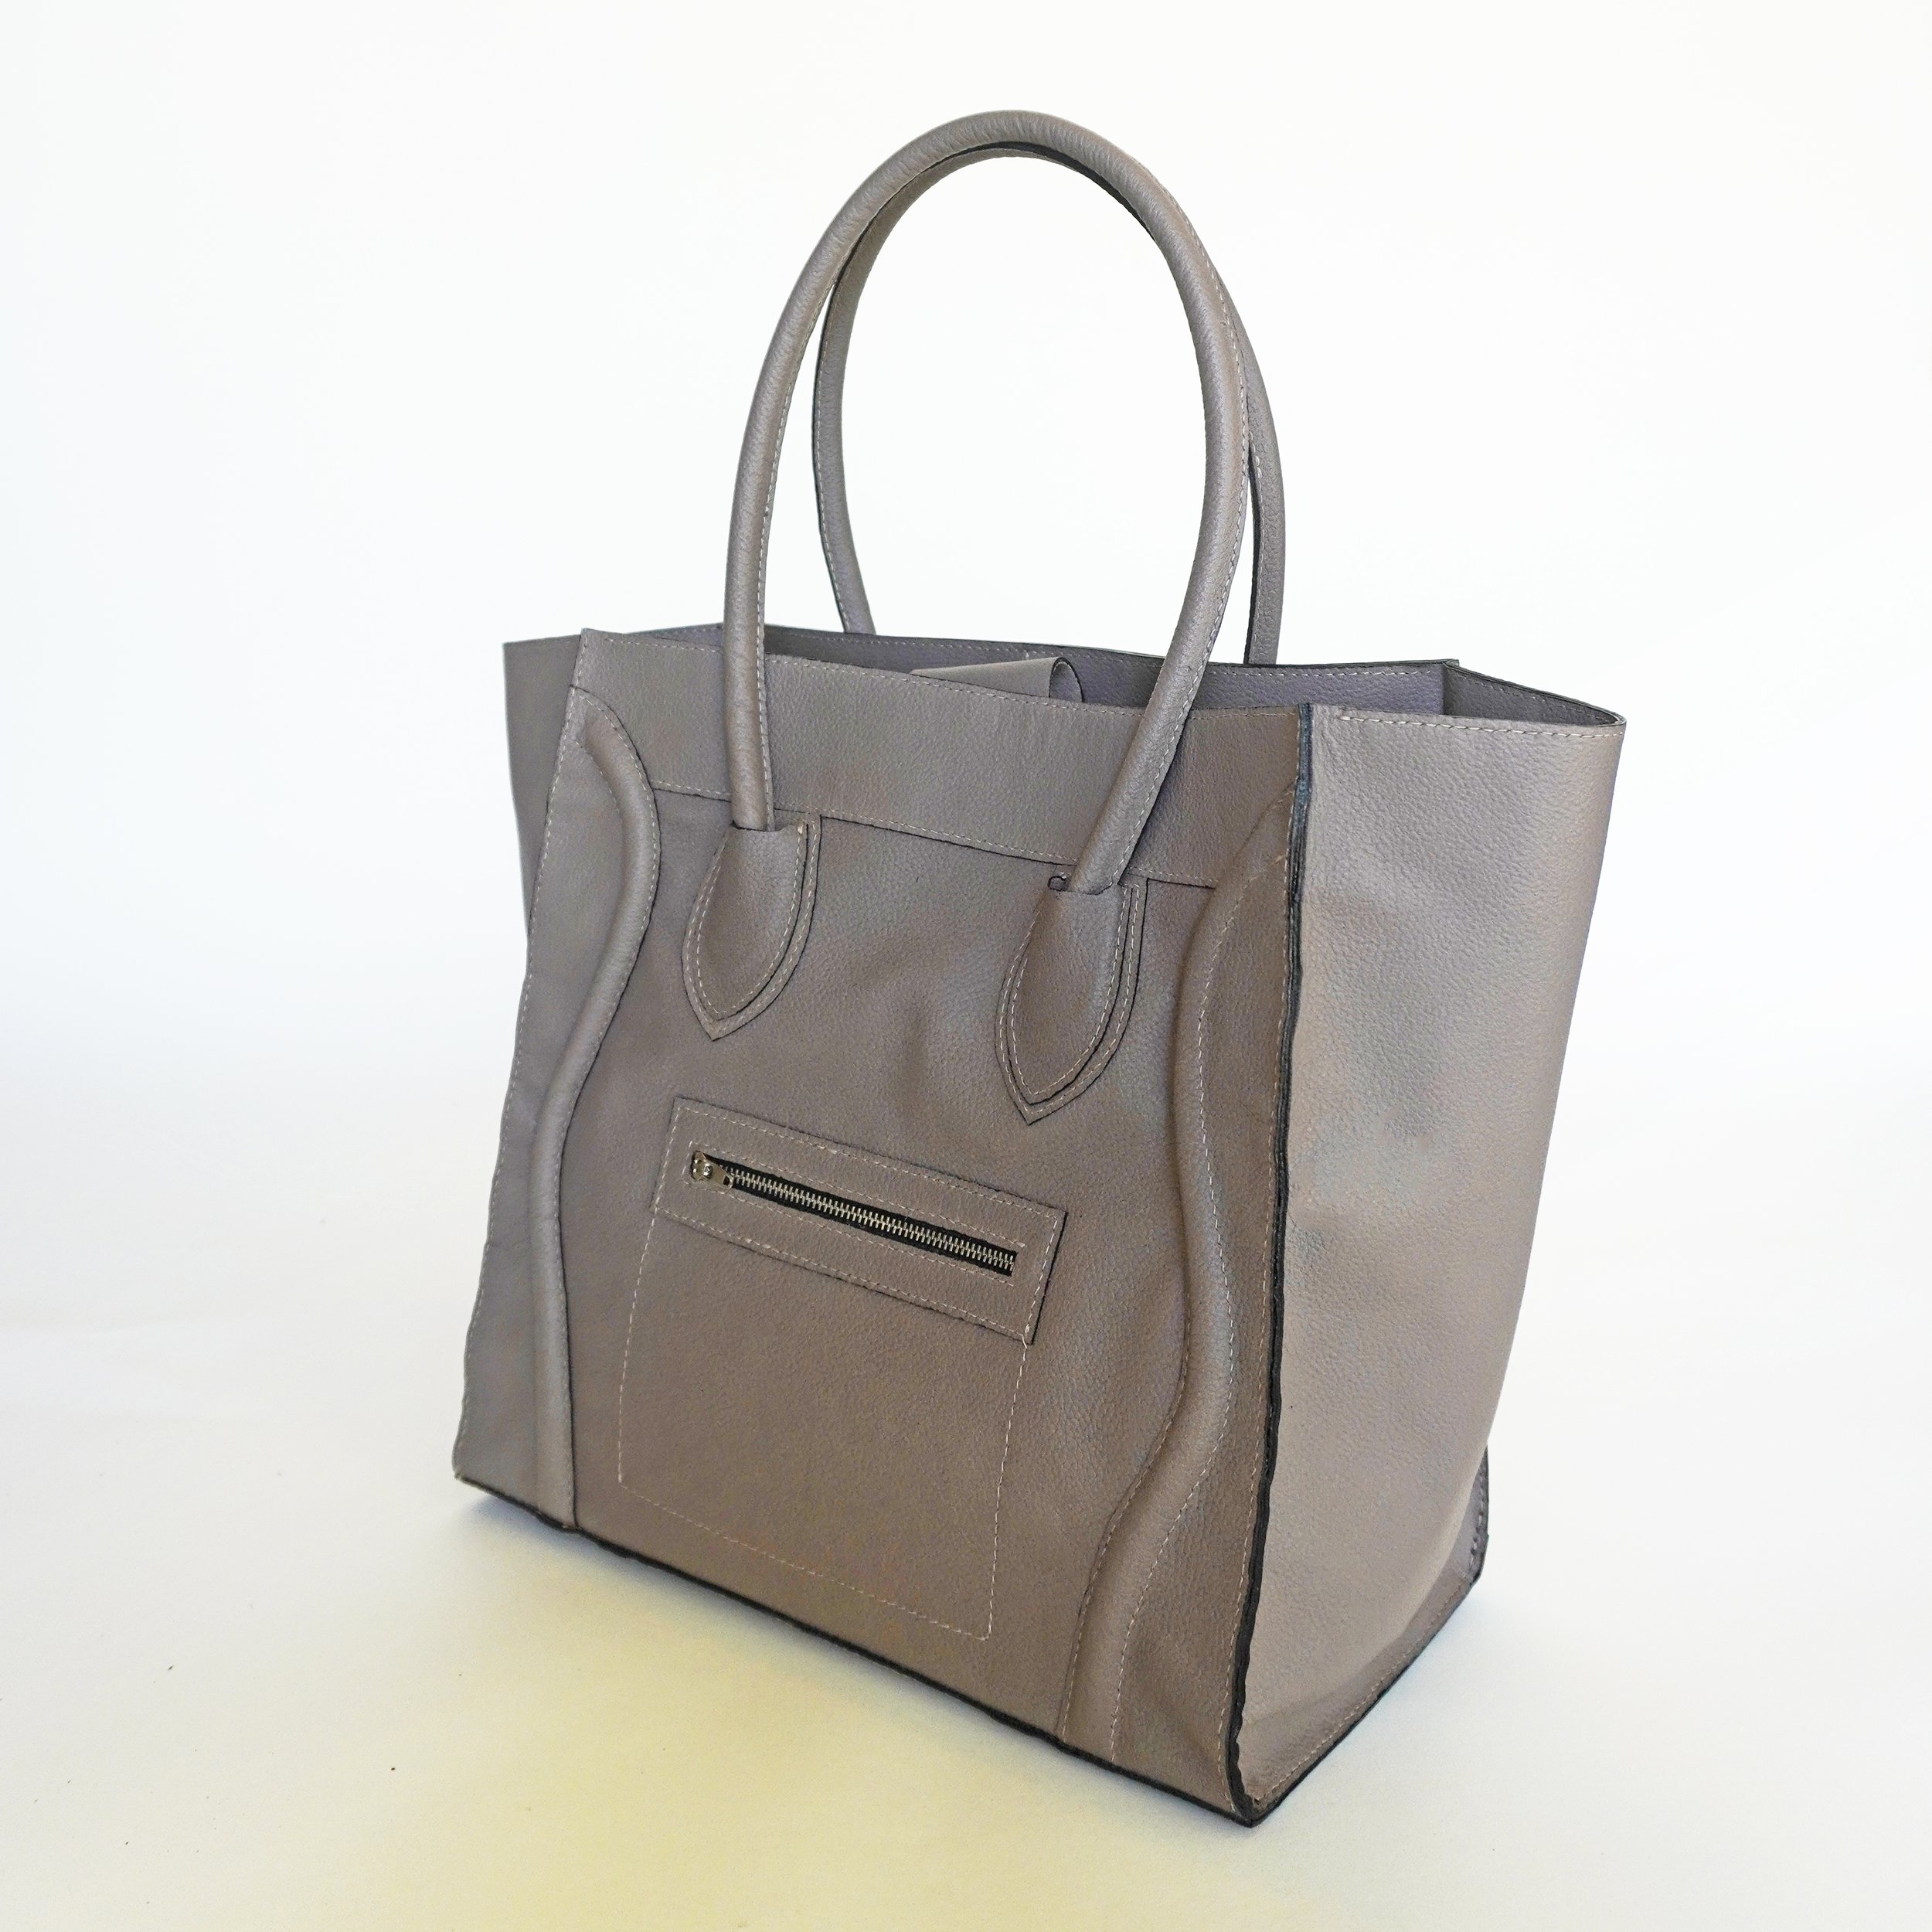
The Finished Bag
I love, love, love my finished bag, which I think looks pretty darn close to the look of the Celine Luggage Tote. The grey color is so versatile and pairs well with lots of different outfits:


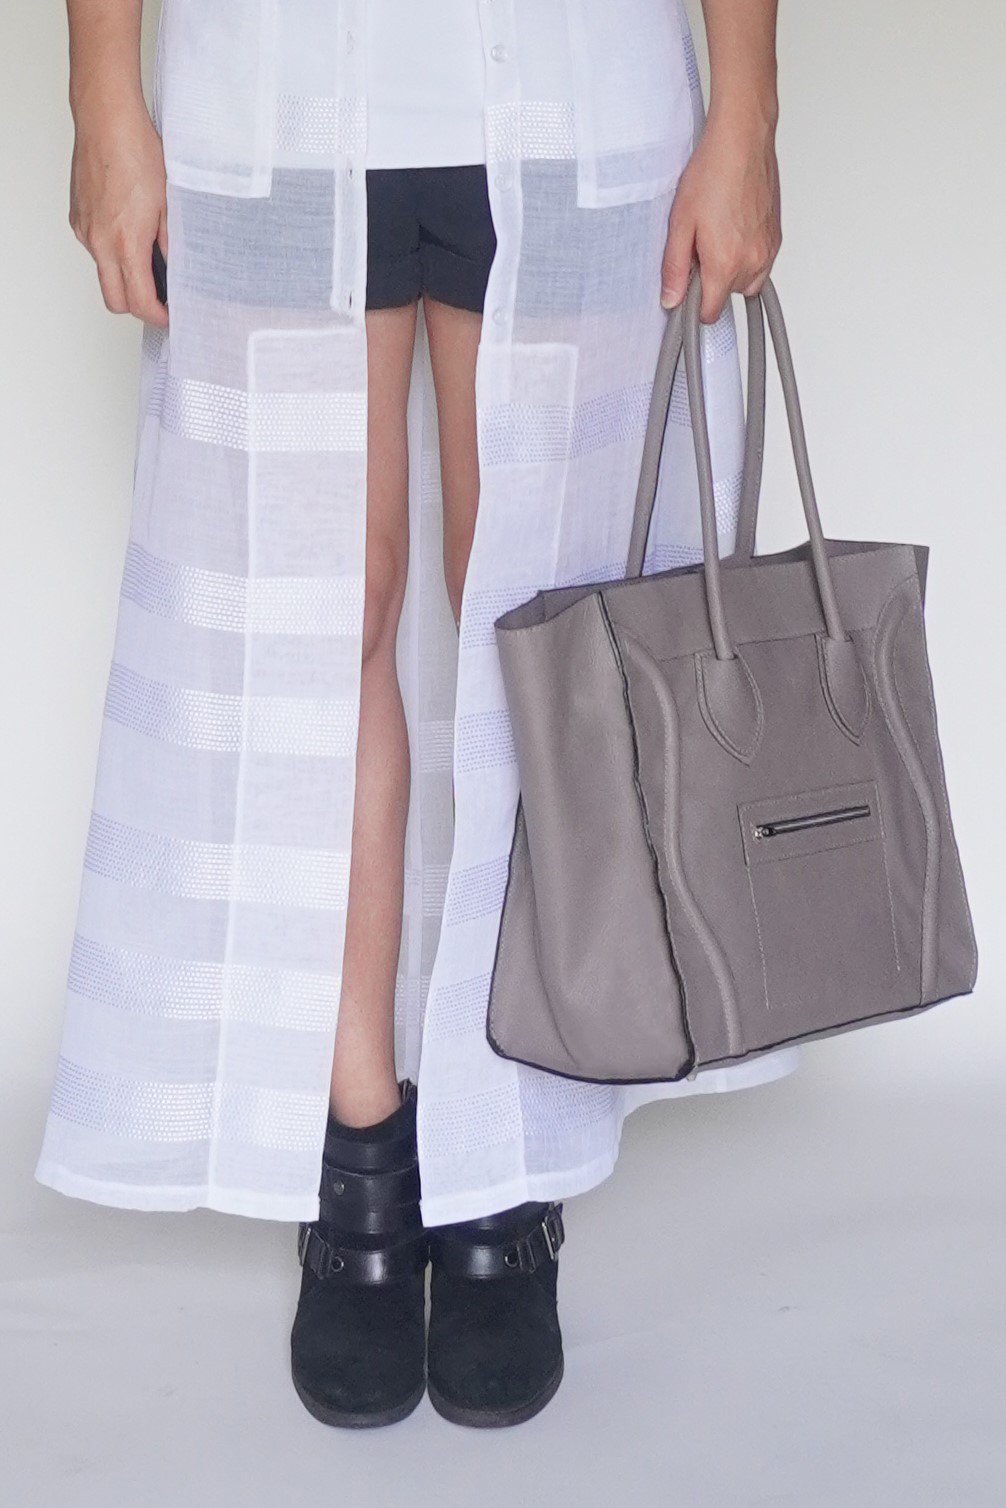
Here are some closeups of the bag and some of the details:

As with all my projects, the bag isn’t perfect, and there are some things I would change if I ever made the bag again. The biggest thing is the bag is a bit too slouchy – I should have added a layer of reinforcement to the front and bag of the bag, so that it stands up completely straight on its own (right now, it does stand up on its own, but it slouches a bit and that creates some unsightly wrinkles). I recently bought some Luigi Carnevali microfiber reinforcement that I think would have been perfect, as it adds structure without adding much bulk.
I also would have used a stiffer interfacing for the bag bottom than the plastic canvas – again, right now, the bottom of the bag sags a bit if there is a lot of heavy stuff in the bag, which kind of defeats the purpose of having bag feet to prevent the bottom of the bag from coming into contact with the floor. I even had some bag stiffener in my stash that I think would have been perfect for this. Oh well, lesson learned!
All in all, though, I am thrilled with the results and I’ll definitely be looking to work with more gorgeous leather from Leather Treasure Shop! I’m inspired to continue making bags inspired by classic designer bags. I think my next project will either be a Hermes Lindy bag or a quilted Chanel flap bag, maybe in a fun pastel color. Stay tuned, and let me know in the comments if you too love to make designer-inspired bags!


