
Have you ever wondered how to make a dress that glides sinuously over your curves and seems effortlessly elegant? The answer is probably cutting the dress on the bias, i.e., on the diagonal to the straight grain line (more on that later). Madeleine Vionnet famously pioneered the technique in the early 1990s, and Halston popularized it for the masses in the 1970s with his slinky, glamorous, body-conscious gowns.
Garments that are cut on the bias will stretch and drape more easily than garments cut on the straight grain. The resulting bias-cut garments will glide sinuously over the body’s curves and fall in graceful drapes. The fabric’s ability to stretch can also eliminate the need for zippers and other closures, as the garment has enough stretch to be pulled over the wearer’s head.
What is the bias of the fabric?
So what exactly does it mean to cut a garment on the bias? All woven fabrics have a straight grain, which runs along the selvage of the fabric, and a cross-grain, which runs perpendicular to the selvage. The bias is simply the diagonal between the straight grain and the cross grain.

When can/should I cut garments on the bias?
Shifting to cutting on the bias works particularly well with camisoles, skirts, slip dresses and slinky evening gowns, because the bias allow all of those garments to skim over the curves.
When getting started with sewing on the bias, choose a simple pattern with minimal seams and no darts. Cut the garment out of a drapey, lightweight fabric such as crepe, crepe de chine, satin-back crepe, charmeuse, georgette and chiffon.
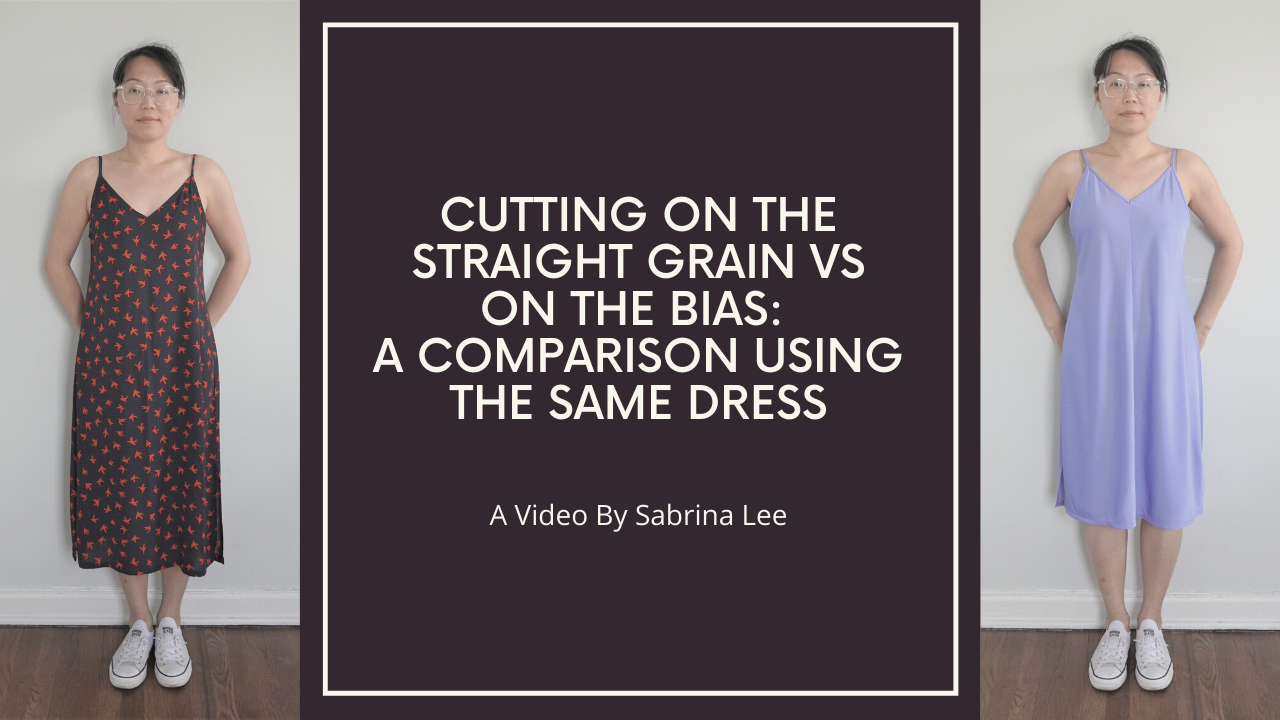
What difference does cutting on the bias make?
You can see the impact that cutting on the bias has on the final garments below. I used a pattern for a classic slip dress developed by Angelia Lin (link to the pattern is at the end of this post), which was originally developed to be cut on the straight grain. I first cut the garment on the straight grain, then I cut the exact same pattern on the bias, to see the impact of cutting on the bias. The change is subtle, but you can see that the bias-cut version hugs the curves a bit more and the fabric is a bit more drapey.
So if cutting garments on the bias is more figure flattering, why aren’t all garments cut on the bias? The answer is that cutting on the bias requires a lot more fabric, as all of the pieces are cut on the diagonal and it is difficult to find a placement that does not result in any wasted fabric.
Working on the bias is also a bit trickier than cutting on the straight grain, because the fabric can stretch while you are working with it. Don’t let that put you off though; you can definitely adapt patterns to cut on the bias with a few tips and tricks, as discussed below.
How do I cut garments on the bias?
It is quite simple to adapt sewing patterns to cut on the bias, if you follow the steps listed below. Alternatively, you can watch this video, which walks you through the process.

Start by marking the bias on the pattern. Take the straight grainline that is marked on the pattern and draw a link that is perpendicular to that. That is your cross grain. Next, mark a line that is 45 degrees between the straight grain and the cross grain. The easiest way to do that is to fold the paper so that the straight grain line meets the cross grain line. That is your bias line. Now that you have marked one bias line, mark the other so you have two different bias lines to work with. You’ll see why you need both lines in a minute.

If your pattern says to cut the front or back as one whole piece, ignore that. Instead, split the pieces into two halves and cut each half separately with the straight grain going in a different direction. If your pattern says to cut the front or back bodice or skirt on the fold, ignore that. Instead, cut out each half separately (from a single layer of fabric) and add a seam allowance, so you have a center seam going down the middle of the front and back. Make sure you position the pattern pieces so that the straight grain goes in a different direction in each half. Because the straight grain and cross grain do not hang in the same way – the cross grain is twisted less firmly than the straight grain and it hangs longer than the straight grain, which skews the balance of the garment and will cause it to spiral around the body. To prevent that from happening and bring the garment back into balance, you need to cut one half with the straight grain going down in one direction and the other half with the straight grain going in the other direction, as shown below:

Use the marked bias line to position the pattern on the bias. Measure from your selvage to the marked bias line to ensure that the pattern is placed on the true bias of the fabric.

Cut the pieces out, taking care not to shift the grain line of the fabric while cutting. If you have a rotary cutter and mat, use that, as that will help prevent your fabric from shifting. If you don’t, place a layer of tissue paper underneath the fabric to prevent it from shifting while cutting.
Sewing on the bias
In general, the key to sewing fabric cut on the bias is to control the stretch in the fabric. There are several aspects to this:
Stay stitch the edges of your cut pieces. This will prevent the fabric from stretching when you sew, which will distort the seam and lead to rippling seams. To prevent this from happening, simply stay stitch slightly to the inside of your stitching line (e.g., 1/8 inch to the right of the stitching line).
Store your cut pieces flat and try to keep handling to a minimum. Carry the cut pieces of fabric to the sewing machine flat, so they don’t stretch along the way. While sewing, try to keep the fabric on the sewing table as much as possible, rather than dangling off the edge of the table or sewing machine.
Don’t pull the fabric while sewing. Let the feed dogs feed the fabric into the machine naturally. I like to use my walking foot, as I find this helps feed slippery fabrics into the machine much more smoothly.
Use a zig zag or other stretch stitch. Remember that bias cut fabric stretches, so you need a stitch that can also stretch along with the fabric, otherwise the stitches may break when the garment is worn. I like to use the lightning stitch, which is a narrow zig zag stitch that looks very similar to the straight stitch.
Hang before hemming. Again, bias cut fabric stretches out over time, so you want to hang up the dress on your dress form for about 24 hours to allow the fabric to stretch out and settle before you hem. Otherwise, you will end up with a hem that is uneven because the fabric has stretched out to different lengths in different parts of the hem.
Suggested beginner bias-cut patterns
Ready to give sewing on the bias a try? Start with one of these simple (and free!) patterns:
Angelia Lin - simple slip dress. This is the pattern I used for the slip dresses pictured above, and it’s a great dress for beginners to bias because it has no darts and only a few seams. This pattern is drafted to be cut on the straight grain, which makes it perfect for learning to adapt sewing patterns for cutting on the bias.
Mood Fabrics - Marigold camisole. This pattern for a basic camisole is originally drafted to be cut on the straight grain, but it is very easy to adapt this sewing pattern to cut the camisole on the bias, using the techniques discussed above.
Pattern Scissors Cloth – Ruby slip. This pattern for a slinky negligee is already drafted to be cut on the bias, so there is no need to adapt this pattern.
Grasser – midi skirt. This free pattern for a sensual, curve-hugging midi skirt is already drafted to be cut on the bias, so there is no need to adapt this pattern.
What bias-cut garments are you sewing up? Let me know in the comments!