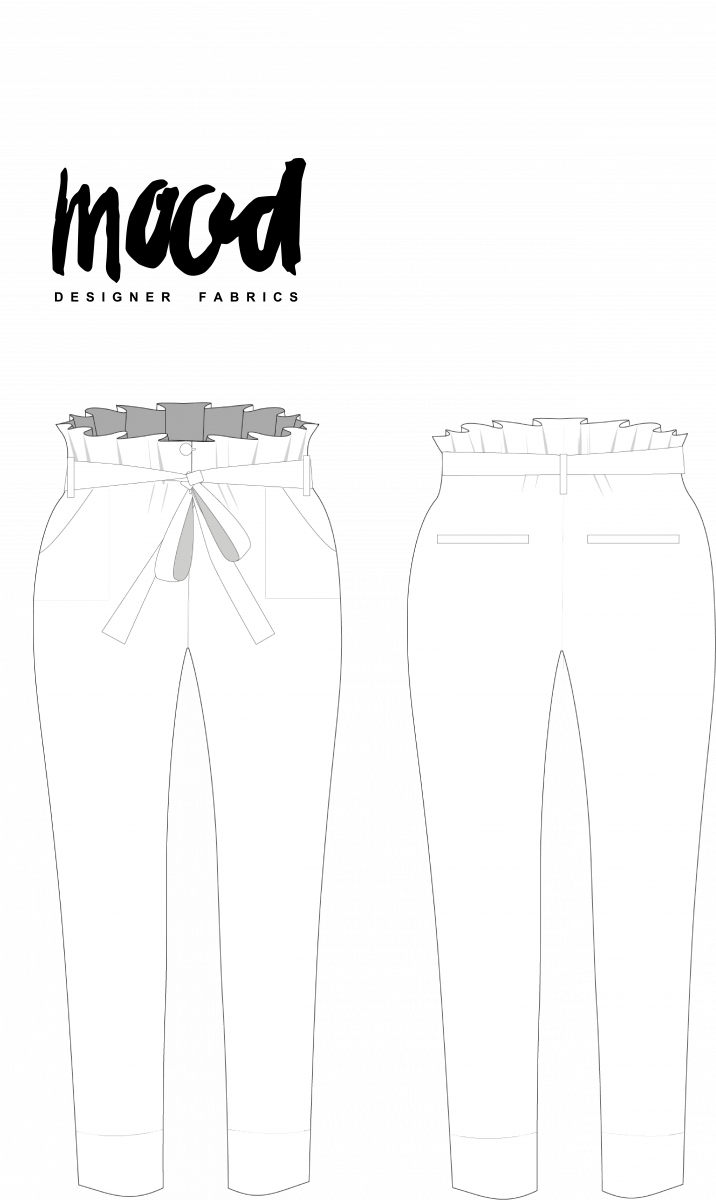
After my last epic couture sewing project (see the finished jacket here), I really wanted a nice, simple project to cleanse my sewing palette. Mood Fabrics’ Primrose Pant seemed to fit the bill, as it was exceedingly simple (only a few seams) and it featured a roomy leg shape with an elastic waist, so there wasn’t much to worry about in terms of fit. Plus, now that I no longer regularly work in an office, I really needed some relaxed fit pants that I could wear around the house without putting on heels.
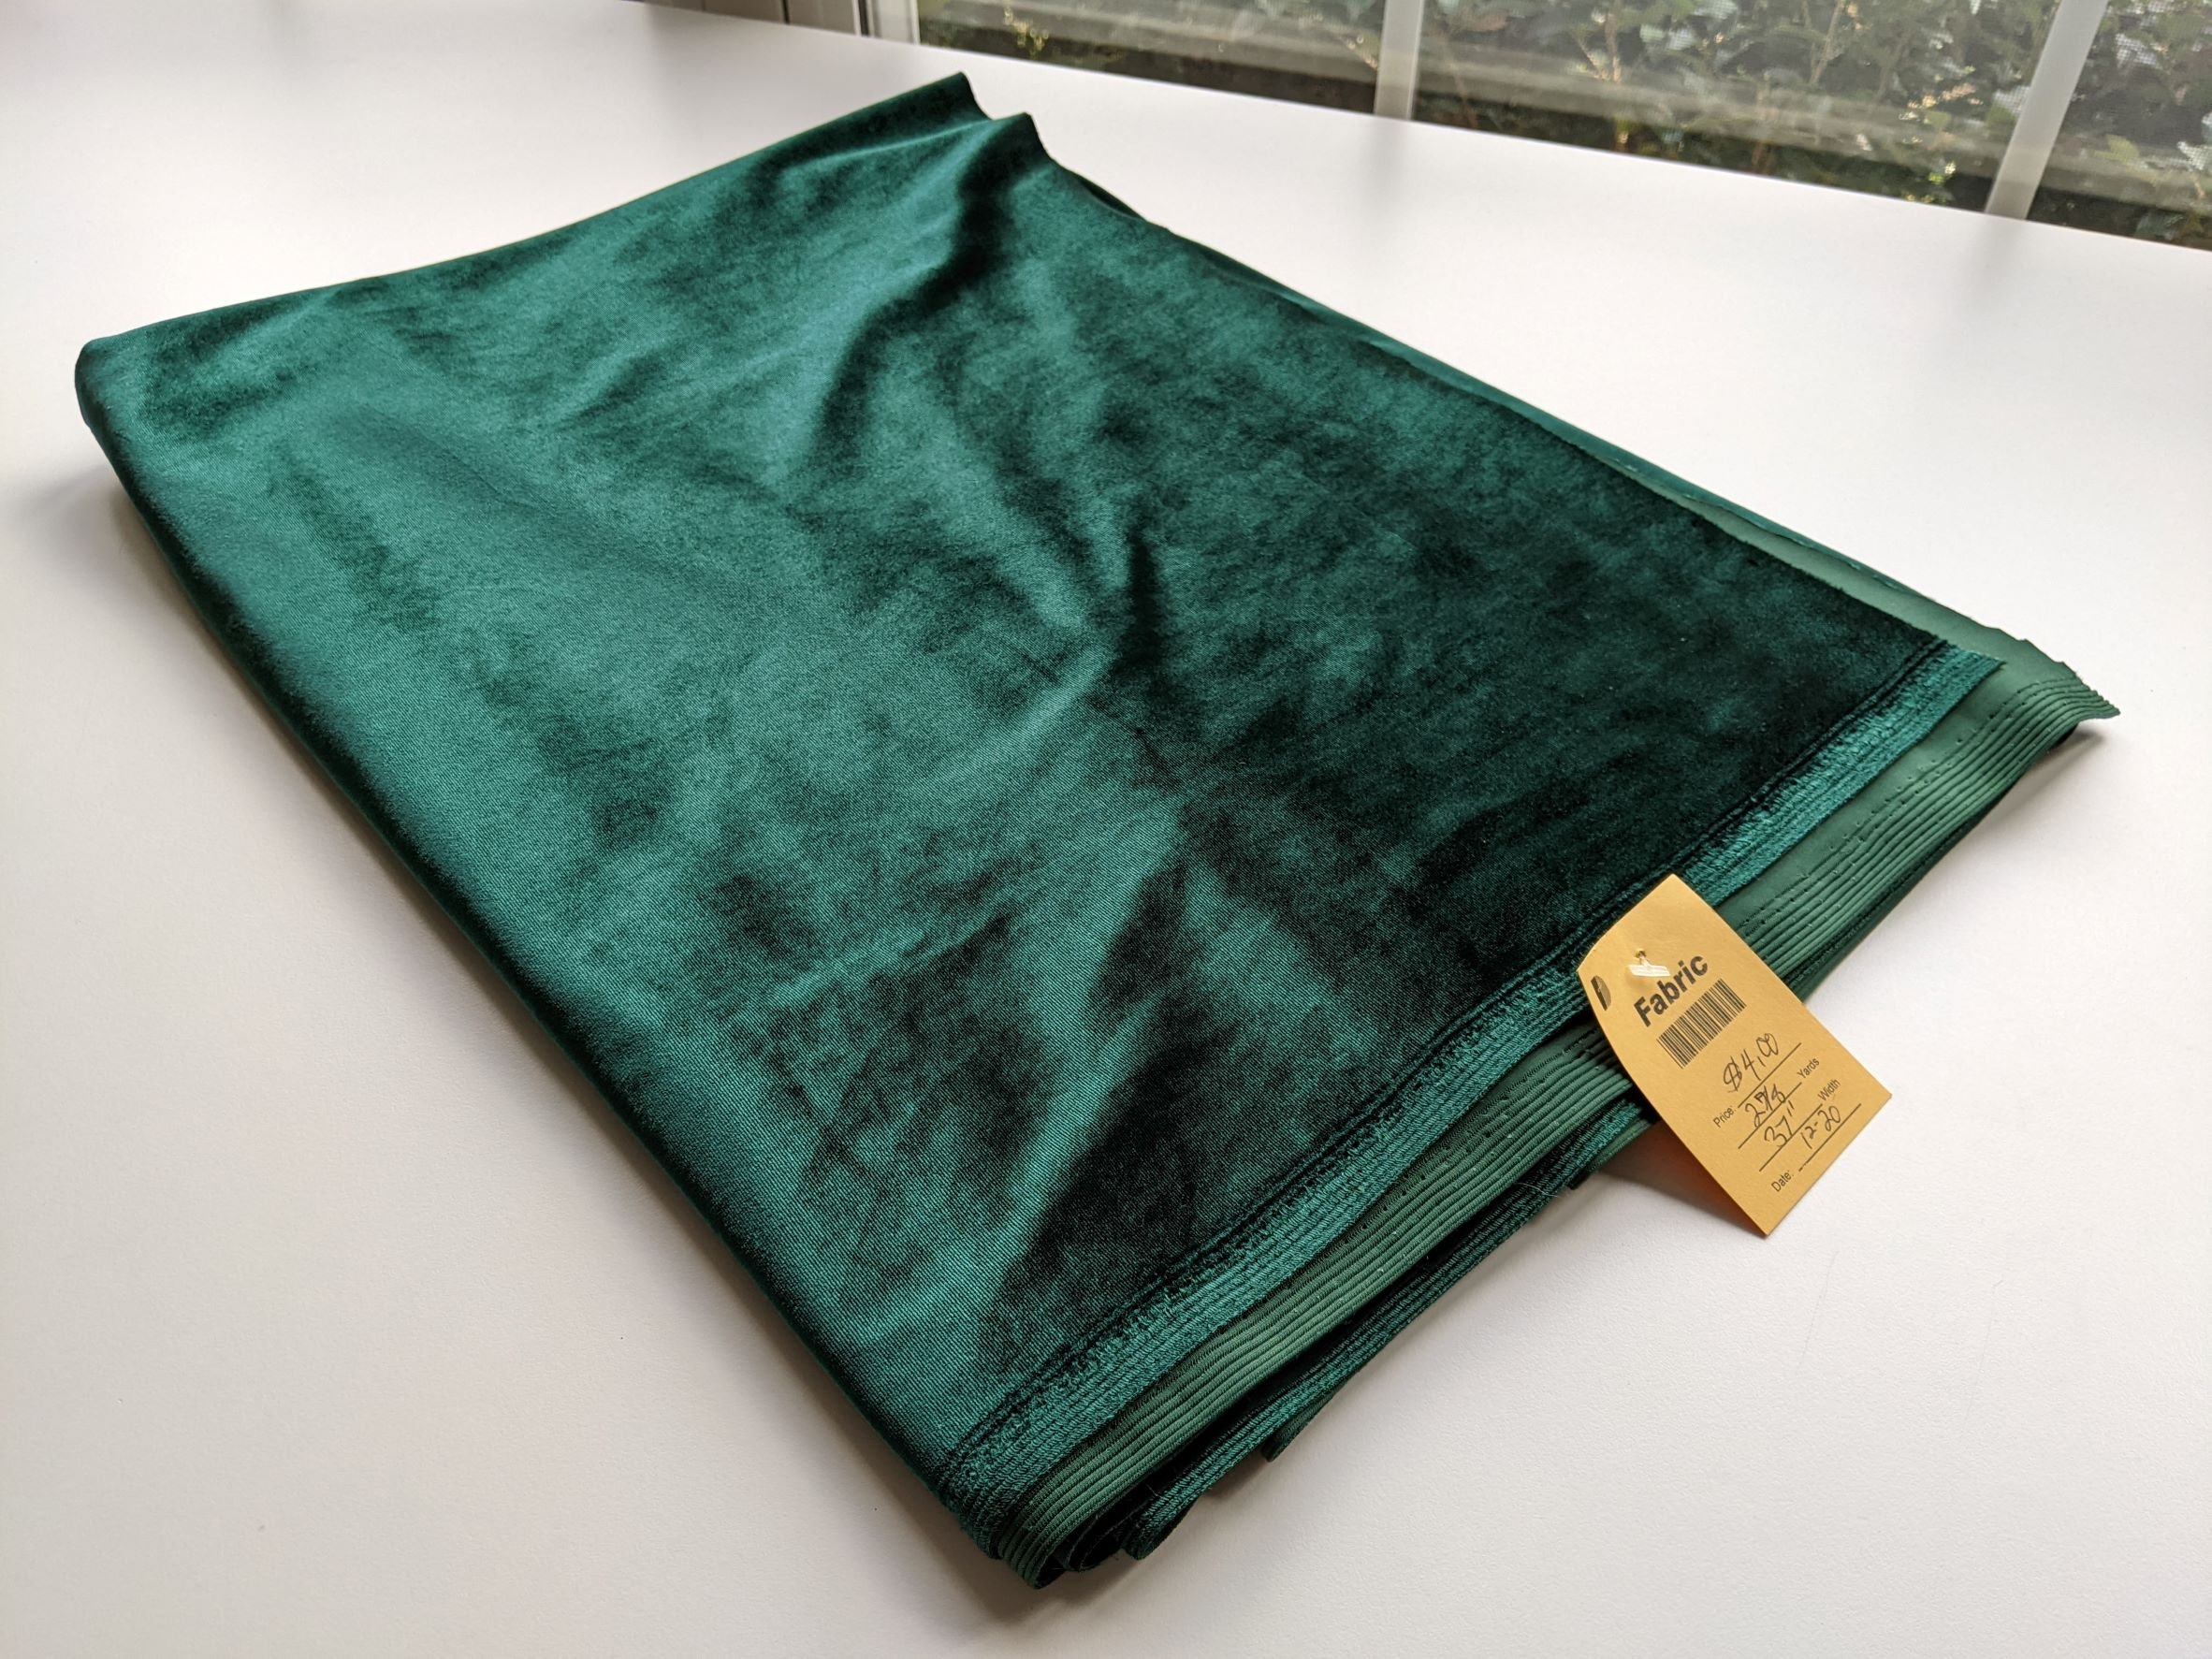
I also was fixated with the idea of making a pair of green pants as part of a crazy print-mix outfit featuring shades of green and orange. So when I happened to stumble upon a large piece of green velvet fabric at my local thrift store, I thought it was meant to be – I mean, how could I say no to $4 for almost 3 yards of 37” wide fabric?!
Pattern Sizing and Adjustments
The first step in sewing the Primrose Pants was to decide what size to cut. In the past, my experience with Mood’s patterns has been really hit or miss, and I have found many of their patterns to be far too large or oddly shaped. For example, I have made this robe, which turned out to be gargantuan, and this wrap dress, which was horribly unflattering. I had also seen comments from other sewists warning that the sizing on the Primrose Pant ran really large, and that pants were far too long for petite women. I therefore decided to cut the pattern according to the dimensions of the finished garment, rather than according to Mood’s size chart, and to make a muslin to check the fit.
Sadly, the dimensions of the finished garment are not marked on the pattern, so I had to measure the pattern myself to determine the size of the finished garment. To do this, I measured across the hip at the front and back, doubled the measurement then subtracted the seam allowance to determine the final hip measurement. Using these measurements, I decided to cut a size 0/2 in the end, even though according to Mood’s size chart I should be a size 6.
The pant legs on the pattern were also way too long for me (I’m 5 ft 2 inches). I ended up shortening the pant leg by a whopping 7 inches, in part because I wanted the pant to hit at the ankle. I also reduced the width of the finished cuff to 1 ½ inches. Tip: to shorten the pant leg on the pattern, do NOT simply cut off the extra length at the pant hem. If you do that, you will lose some of the taper in the pant leg, which is a defining feature of this style of pant. Instead, slash the pattern in the middle of the pant leg, then overlap the two halves of the pattern until you have removed the excess length. Then, re-draw the edges of the legs so you have a smooth line once more.
Constructing the Pants
Once I had made my pattern adjustments, the construction of the actual pants was pretty simple. I finished all of the raw edges using my serger, and I skipped the welt pockets as I don’t think they would look very good in my slouchy velvet fabric. I also skipped the belt, as I thought the paper bag waist on these pants would already add a lot of bulk around my waist, and I didn’t want to add to that with a belt. (I have a relatively thick waist proportional to the rest of my figure, so I’m always sensitive to this issue.)
I also didn’t think the patch pocket would look very good in the velvet fabric, so I converted the patch pockets to side seam pockets. I used the pocket pattern from McCall’s 7950, which I like because the pocket is large and slanted so your hands fit in comfortably. I cut one side of the pocket bag in the velvet and the other in some green printed cotton from my stash, to give the pocket some structure.

I finished the waist using some ¾ inch white elastic. To get the elastic length, I just wrapped my elastic around my waist and adjusted it to a width that was comfortable but also tight enough for the pants to be secure. I then marked the elastic where the overlap was, and cut off the elastic about 1 ½ inches past that point. Others have said that a handy way to determine the length is to take your waist measurement, then subtract 2 inches, but I think this way is better because some types of elastic can be stretchier than others, so it’s always best to just experiment with the elastic that you will be using. For velvet, I needed to make the elastic tighter than usual, because the fabric is quite heavy and there’s quite a lot of weight hanging off that elastic.
I also decided to use two rows of elastic, rather than just one. The fabric channel at the waist for the elastic is a whopping 2 inches wide, and my elastic was only ¾ inch wide, so there was plenty of room for another row of elastic. My velvet fabric was also quite heavy, so it really needed the second row of elastic to make sure that the pants didn’t slip down my waist. To insert the second row of elastic, I simply sewed a line about 1 inch from the top of the waistband, to enclose the first layer of elastic, then inserted the second length of elastic below that. I then tacked the first layer of elastic at the side seams, to prevent them from twisting inside the fabric channel. The resulting (double elastic) waistband sits much more securely and smoothly across the stomach than the original (single elastic) waistband.

The Finished Pants
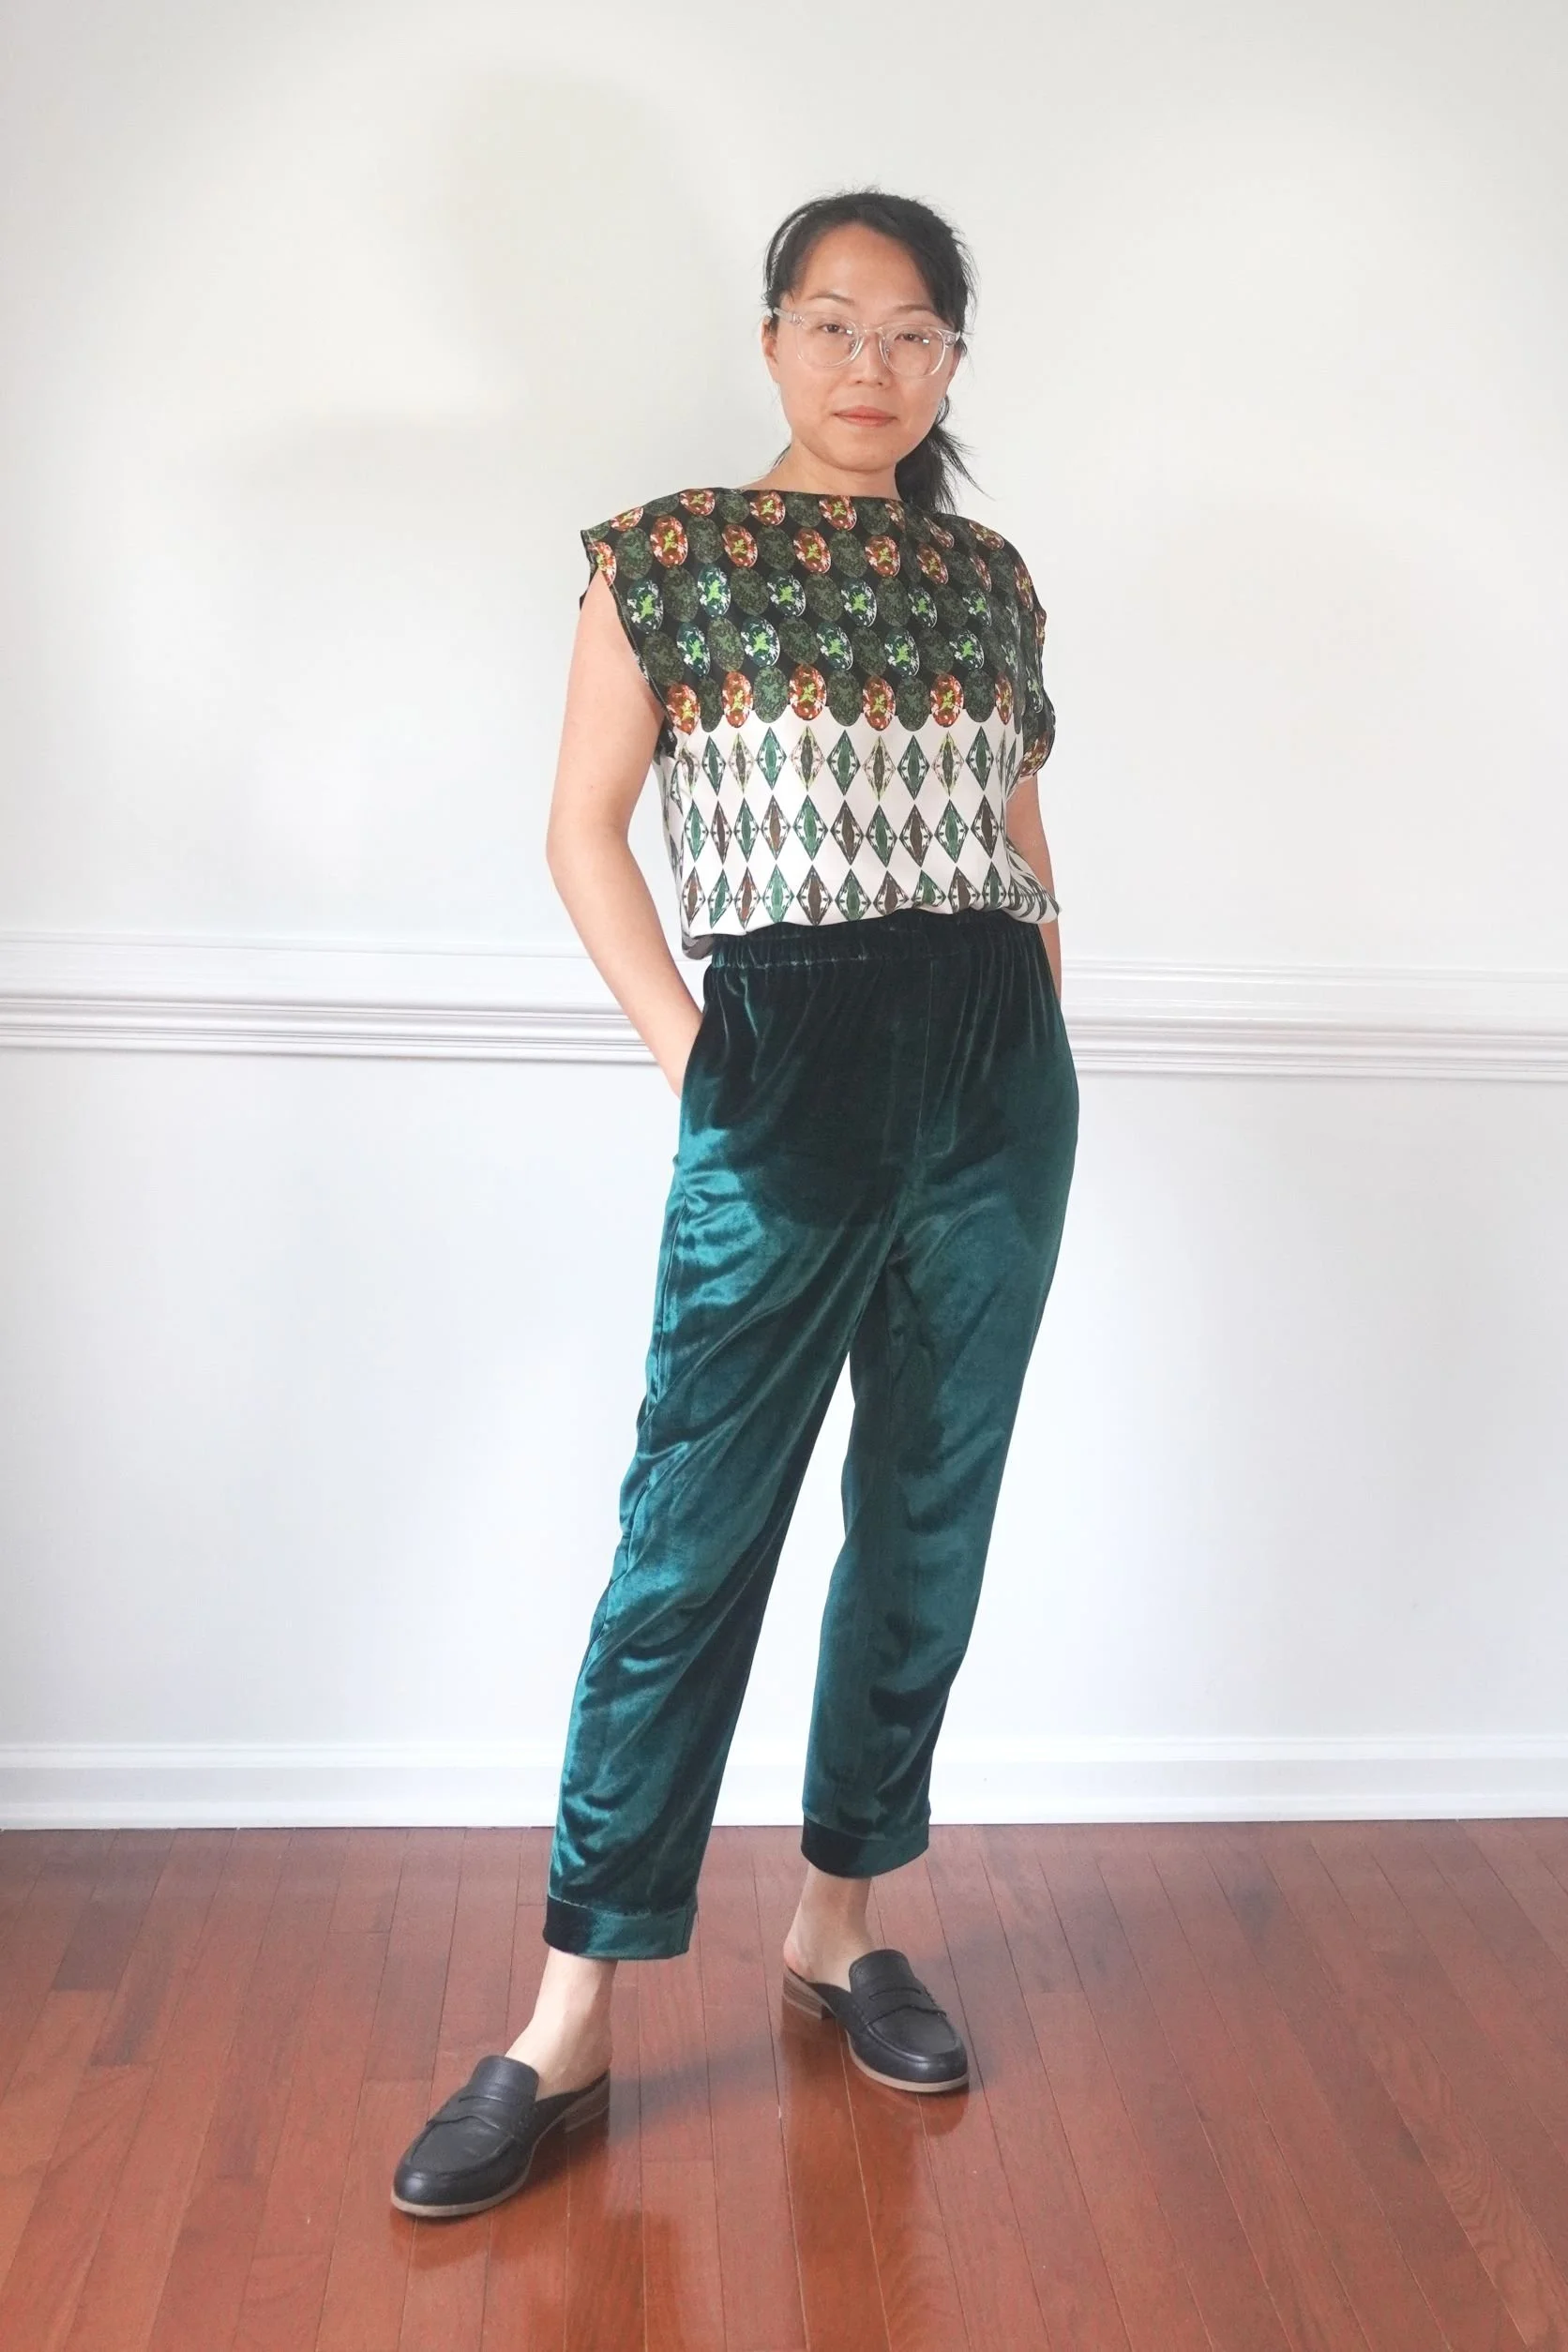
I really love my finished green velvet pants, which I think are really flattering with their roomy yet still flattering silhouette. Best of all, I can wear the cropped pants with flats without feeling like a munchkin! Here are the pants paired with a green print silk top, orange print jacket and black slip-on loafers. I call this my “quirky liberal arts professor” look:
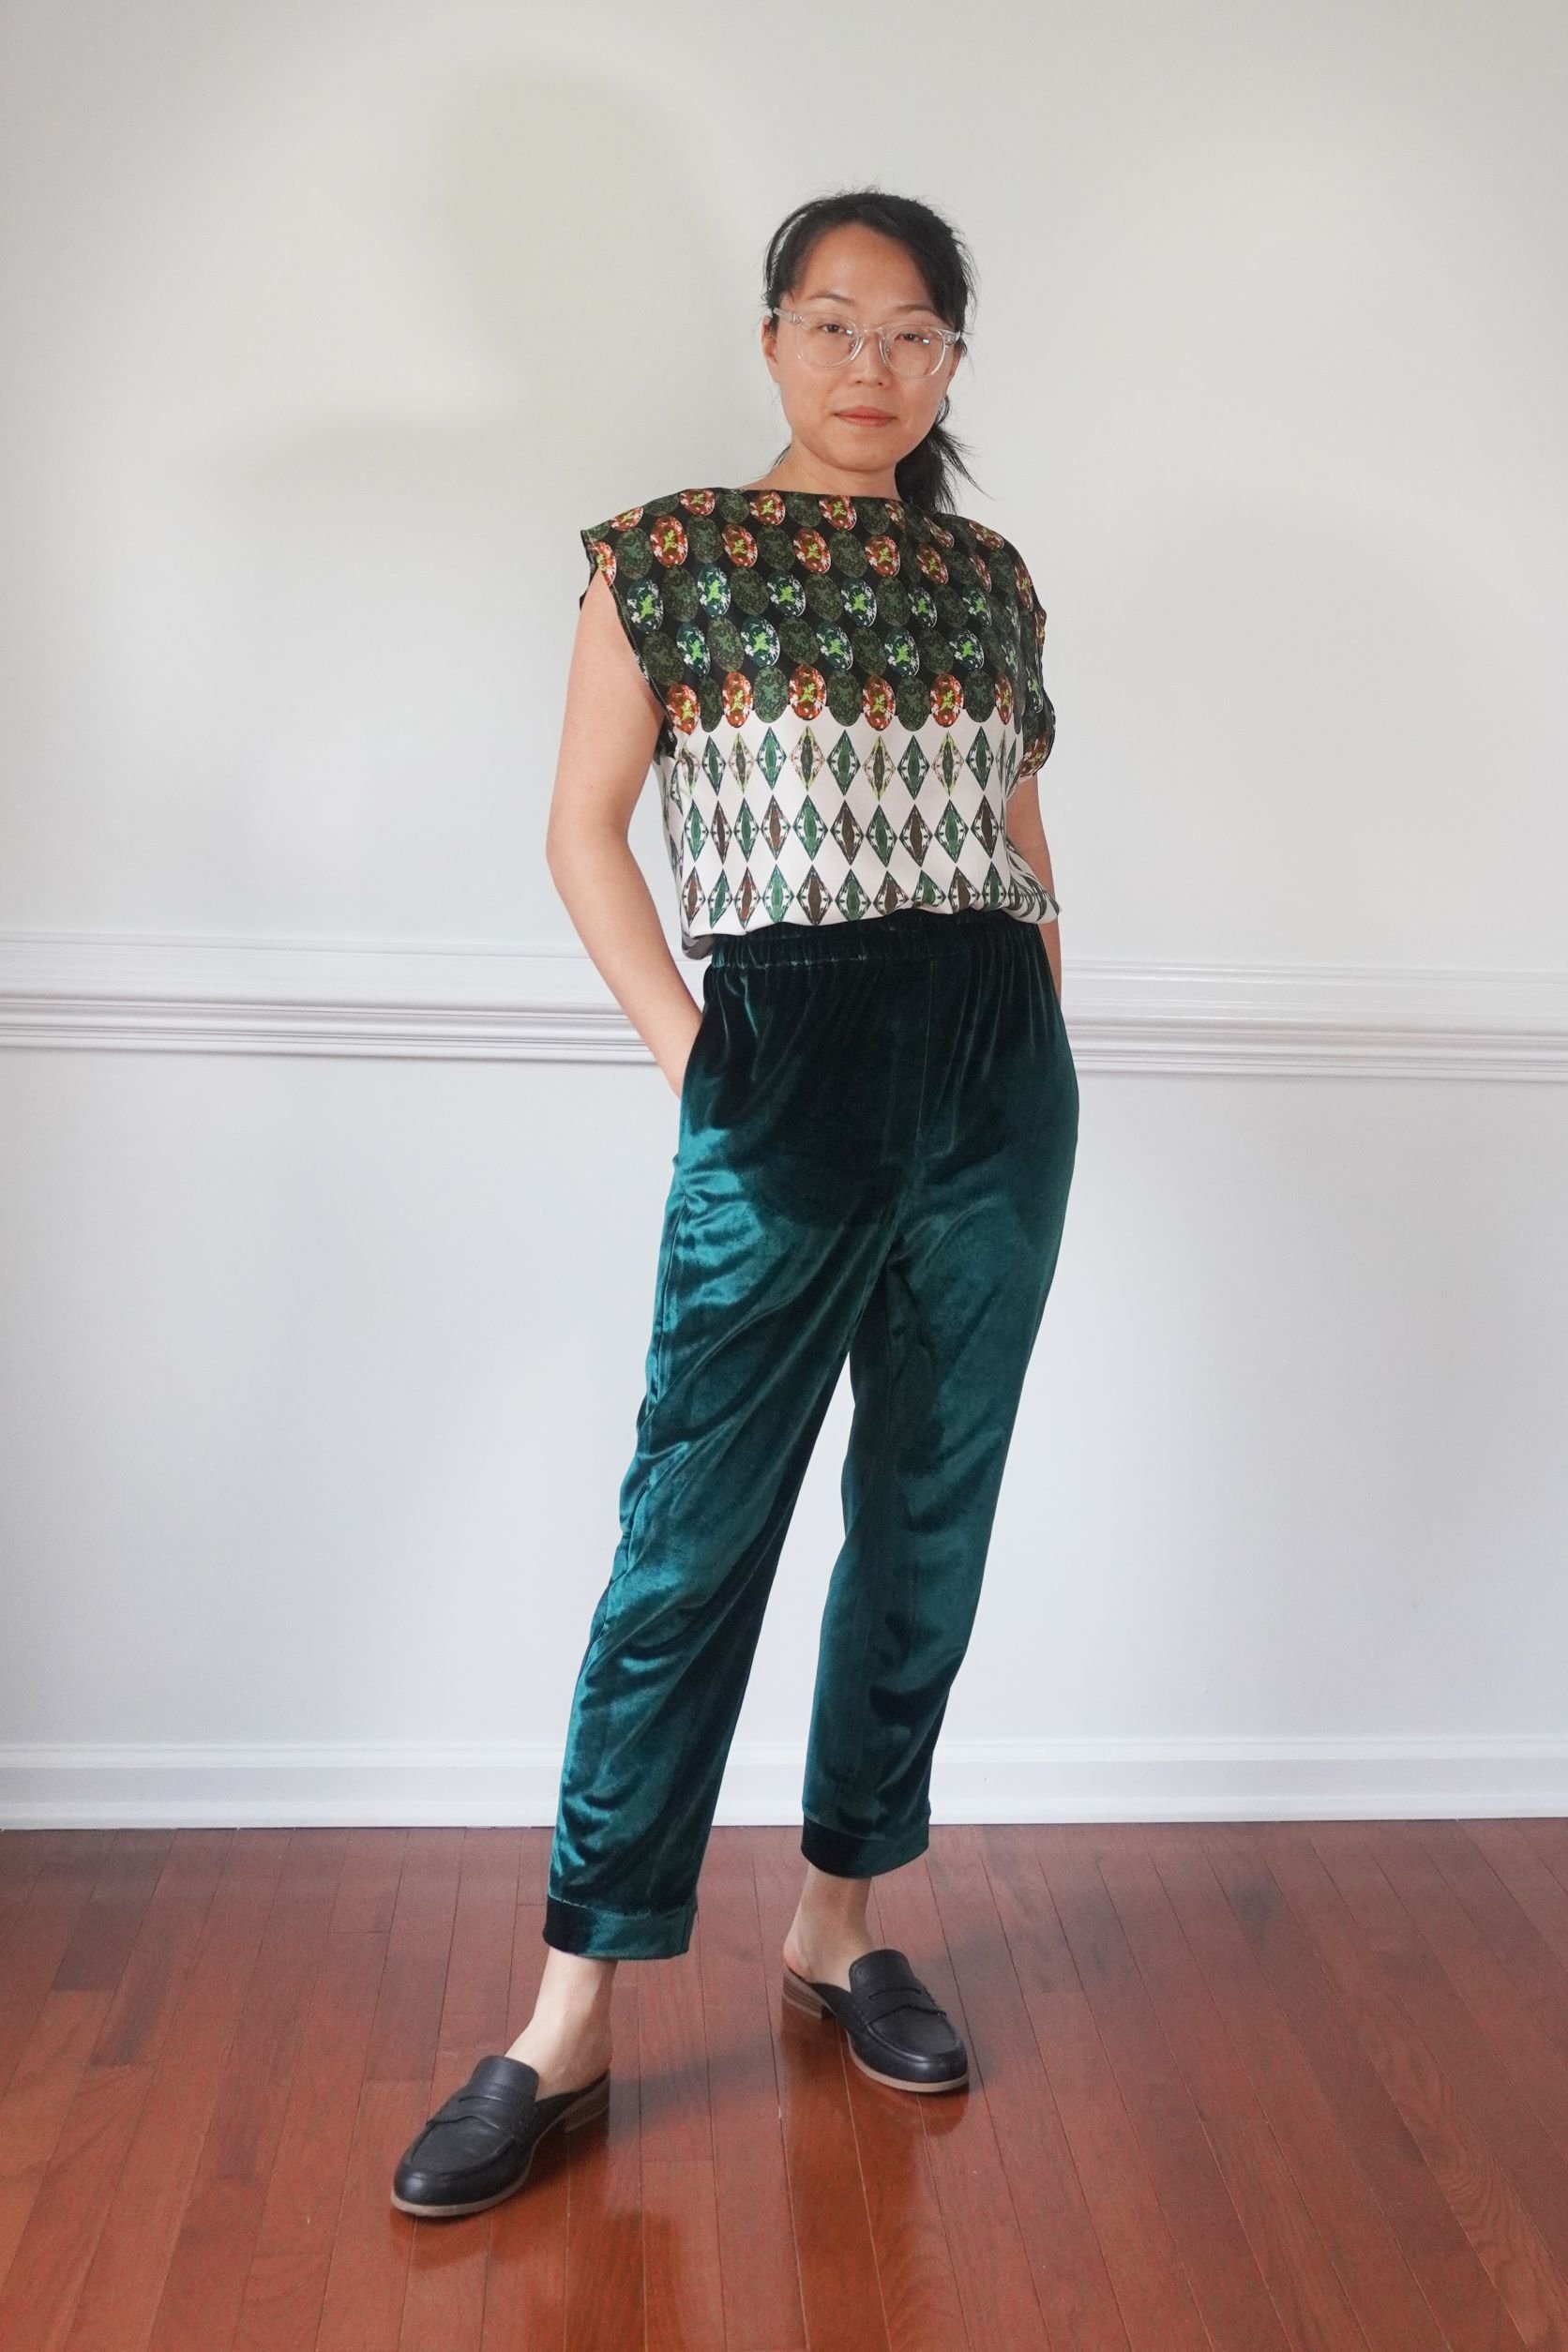

The green silk top was made using Butterick 5463 and some lovely printed silk charmeuse from Mood Fabrics. The orange print jacket was made using Vogue 1751 and a thrifted curtain. (Read all about that project here.)
I like the shape of these pants so much that I might make this one of my tried ‘n true (TNT) pant patterns, once I fine-tune the fit of the pant in the back. As you can see from the picture below, the fabric is sagging below my crotch in the back, which I think means I need to make a flat butt/seat adjustment:

I tried pinching out about ½ inch across my butt and that seemed to fix the problem, so I’ll be sure to make that adjustment in the pattern so I can get the fit right next time. (To learn how to make a flat butt adjustment, check out this tutorial.)
I can’t wait to sew up more pairs of Primrose Pants! I can see the silhouette working in a lot of different fabrics, from work-appropriate fabrics such as tweed or wool suiting, to casual summery fabrics like linen or chambray.